

I visited a company called 'All board' a couple of days ago which is just around the corner from my work.
The address for this place is 33 Jersey Road Bayswater Vic 3153.
There phone number is 97215700 Fax: 9721 5799 and email is info@allboard.com.au
I need to find a good substrate for the hand veneering that I was going to do. I wanted to use a ply rather than a particle board or MDF.
A few of the main reasons why I didnt want MDF (which is a common material used for veneering) is the dust. The dust really irritates my skin. Ill be doing a lot of routering and cutting with the panels so I decided to go for a different alternative. Also I have found that MDF isn't really a good material for bonding at the ends. It is great for the face for veneers but the ends because of the really opened poors (from the compressed material/ glue) you tend to have to do a double application of glue. Majority of MDF is actually glue. The glue soaks into it very quickly.
I need a strong end section for bonding due to some of the panels having loose tenon connection points. One alternative was with still using MDF but having a timber boarder around it and than veneer over the timber as well with the MDF. The reason why I didn't choose this was because of timber expansion. I didn't want it to expand too much where a couple of years or more from now would push up and create a lipping which would show up heaps under the application of oil. Creating a step in the veneer.
Plus also it could create just another process which with compared to using ply would be quicker as this process would not be needed. Comparing ply to MDF ply sags less. Now ply still does sag but depending on the choice of ply the sag will vary some times a little bit or none compared to others. Again this really depends on what kind of job your doing. For this job I don't have much play with certain sections so I needed a material that wasn't really going to move heaps.
Another positive for the ply compared to the MDF is that it would take the ZYSA hinges so much better. For the MDF to take the hinges a timber boarding again would still need to be added. Plus also since thinking of installing a lock latch mechanism and magnet housings I need to make a housing for them by hand. A lot easier to make a latch housing/ magnet housings by hand will ply than will MDF. MDF doesn't go well with chisels where with ply its a lot easier to work with. In the housing there would be different sizes steps that would need to be chiseled out.

There were a few different plys that I was shown. The first one is Marine Ply. Now this one is an imported one. Australian ones you will pay an arm and a leg for a 2400/ 1200 sheet. Again depends on the job and budget.
I didn't need this so much since marine ply is used more for exterior applications or other areas where it will be aproned to moisture.
The sizes that I was shown for this was 4mm, 6mm, 9mm,12mm, 15mm, 18mm and 25mm.
Note: with plys and veneers try and get samples so you can use it as a reference.
I wont go into the whole science with the compression layers and all. But the main basic rule of thumb is that ply wood is a manufactured board made up of 2 or more layers. Each layer alternates in grain direction at 90 degs. The thiner the layers and more will reduce movement plus have more structural strength. There are all sorts of different plywoods used for different applications. They are made in different ways for specific purposes so its best to do your research to see what plywood you really need.
Plywood is usually made up of odd layers. This is to spread the structural load evenly across the whole panel making it balanced which avoids things like twisting, bowing, cupping etc. Also it reduces the shrinkage and expansion and makes the board have even strength in both directions. Plus reduces cracking when screwing/ nailing into the ends.
Think of it this way. If I have crossed grain and long grain layers it will be more structural sound. ie
up, running on y axis (grain direction layer 1) across, running on x axis (grain direction layer 2) repeat to odd layer. This will make it harder to bend. (move) If I try to bend the plywood in the direction of the grain on the top face the bottom layer will try to prevent the bend from happening since its grain is running in the opposite direction. It is the same the other way. Now if you increase the number of alternating layers it will make it even harder to bend. Plywood in many construction scenarios is more structural sound than steel. now Imagen how strong bamboo is to steel now try and see that in plywood form.
So if you ever have to sand plywood boards down. The thickness you take off one face you must do to the other to keep the board balanced and if you add a layer even if its just a .6mm veneer layer you must do another layer that thickness on the other side. Always have odd layers.
Some plywoods do have different thicknessed layers but each layer with its identical layer is the same thickness again to make the board more structurally sound.

Now this plywood board is NS/ BC now I would highly recommend not to use this plywood for hand veneering. The plywood is used a lot in construction where aesthetics are not needed. You will find with this plywood it will move more compared to the marine and other plywood boards im going to be talking about.
One of the reasons is due to number of layers used. Again less amount of cross grained layers more ability to bend/ move.
Also it will be filled with a lot of checks, knots and splits. which you will need to repair with bog or glue back down and fix. You cant have this since you need a clean even flat service when your hand veneering. Not covering an opened knot or crack will make the veneer sag which will look unpleasant.
This is one of the cheapest plywoods on the market and out of the selection I am talking about it is the cheapest.
I didn't bother getting sizes since I was not even going to consider using it this is just an example of one end of the spectrum to the other.

This plywood is B/B Hoop.
Now ill explain what B/B stands for. You can get plywood with different grade faces. You can either get them the both quality same face or if one face is not going to be seen than you can use a high grade face and a lower grade face. I don't need a super high grade face since I'm covering it but i still need a good face where there is going to be no knots, splits etc that ill need to repair.
Sizes and prices sheet size standard 2400mm by 1200mm
12mm will cost you $88.15 including GST (these prices are from All Board and may vary with other distributors. These are the most up to date but may change each year. )
15mm will cost you $117 including GST
19mm will cost you $122.55 including GST
25mm will cost you $207.10 including GST.
Note not very plywood board comes in the same sizes everything varies.
This was my second choice mainly because it has less alternating grains plus didnt have all the thicknesses i needed.

Now this was my first choice.
This is Ply Birch. Now the bad side this costs the mosts but as you can see has very tight layers and has the most alternating layers. Plus has the cleanest face compared to the rest.
I picked this one since I want the least amount of movement as possible.
sheets in standard 2400mm by 1200mm sizes and prices include GST.
7mm- $72.34
12mm- $91.46
15mm- $108.50
18mm $128.70
Another disadvantage with this one is that it doesn't cover some of the thickness plywood boards I need for parts. what ill need to do is glue up two different sized thickness panels together and sand down evenly on each face to get to finished thickness I need before applying veneer.


This is what I was talking about with the NS/BC plywood. This one isnt that bad I have seen a lot worse but as you can see there is knots/ splits that ill need to repair before any veneering would take place. And also even though this was just a small sample you could see that it was bowing the most out of the rest. Now if its bowing like that and its just a small piece Imagen what it would look like with a very large sheet.
Today I went to one of my veneer suppliers I was talking about. The below photos are of his garage where he stores his veneers.
My suppliers name is Peter Scott Young. He lives in Ringwood East. His details are online. If you cant find them ill send them to you. But I wont post them up on this page since his business is from home.
The good thing about this supplier is that you don't have to buy your veneer supplies in bulk. You can if you choose to but its not required. Most veneer suppliers like George Feathers for example if you want to purchase veneer you have to buy a whole pack. Now that can have its advantages since it you gives you a bit of selection to choose from especially if your doing book matching.
I tend to like smaller places since customer service is a lot better. The selection from smaller places can be wider than bigger places but in less quantity so again it comes down to what job your doing. Again smaller places can be a bit of a lucky dip plus also you don't have to fight for stock which is good.
Peter Scott Young was happy enough for me to take photos of his veneer shop.

This is like a kids toy store for me

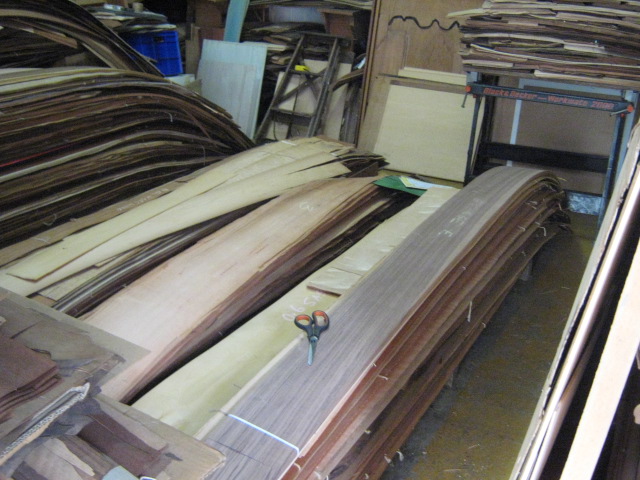

All these veneers are .6mm which is standard. Sliced from the tree. Each veneer will be a different width depending on how the tree grew. Different sections of the tree will give u different figures like burls etc. Most exotic timbers the veneer leafs will shorter in width.

From the looks of it it seems like this is from George Feathers. hmmmmmmmm. maybe he buys it than sells in in smaller quantities for people like me YAY. Any way at the moment im wanting to use Wenge ( which is an African Timber that comes in a dark rich chocolate brown. Now this isn't Wenge it is American BlackWalnut.
Peter Scott is still looking for the Wenge for me and will let me know next week. Although Walnut fits more into the timber selection for the Japanese piece. Meaning its not a traditional timber used but was used a lot by Japanese cabinet furniture makers after 1868 due to western influence and other foreign influences. This was advancements in the lumber production during the Meiji period (1868-1912)
The Wenge was more just for the aesthetics. I originally was going to use oak and ebonize it but after seeing some examples of what it looked like. Some similar processes made it look very pale grayish black not really the colour I was looking for. There is really a lot in depth research needed in this as I have seen some applications that do work but due to the time line ill do that for another day. Plus some process that do this weaken the material making it very brittle when injecting the colouring. its usually done in a bath and dried.
Choosing a darker timber would make things easier since I would not need to mask off the edging when staining the oak. It could just be oiled in one go if using a darker timber.
One reason as to why this is not a traditional Japanese piece is because Traditional Japanese pieces were not done in veneer more solid timber. They believed that using veneer made it look fake. Veneer has been traced back to ancient Egyptian times.

Its not a good picture much better ones below. But originally for the inside of the cabinet I was thinking of using a maple. This isnt maple but a figured Birch. Maple was a traditional timber used during Japan. But Beech was another influenced timber.

Note: Great idea and I'm going to start doing it now. Each time you start a new project and use a different veneer place it in your veneer book. What this book will look like is just a office ringed folder that has heaps of the plastic sleeves. place the veneer in the sleeve and note the name of the timber. This will be so helpful for you. As some veneers have different figures to others. If you are wanting the same figure you can take it to your supplier to see whether they have what you want. Basically your using it as a reference book that you can use for ur self show clients or help suppliers find what you exactly want.


Above Photos are of the Figured Beech. I think this will look great when oiled up and properly book matched in side. normally you don't have highly grained figure when an ikebana is presented in front of it. But this does not seem too bad. The maple below seems too plan and doesn't have enough character.

This is American Black Walnut. Once oiled it will look a lot darker.

This is the Maple. Clean grain not that much figure. The Japanese liked having that clean look for some pieces.
I was originally going to make my own veneers but i might not do this for the whole thing. Certain sections like the drawer boxes ill need to make my own veneers more so for the sides since i need a thicker veneer than .6mm
I was looking at obtaining Wenge or American Black Walnut from Mathew Timbers and American Hard Maple. I did end up getting a quote which was
Now this quote covers some other timbers im using plus also thinking of using.
Note: timber is measured in Linear Meters for purchasing Veneer is measured in Meters squared for pricing.
Rough sawn Wenge 250mm*25mm $81.20lm
Rough sawn Wenge 200mm*25mm $64.95lm
Rough sawn Wenge 150mm*25mm $48.70 lm
Rough sawn US Walnut 250mm*25mm $31.69lm
Rough sawn US Walnut 200mm*38mm $40.53lm
Rough sawn US Walnut 150mm*38mm $30.40lm
Rough sawn American Hard Maple 250mm*38mm $52.02lm
Rough sawn American Hard Maple 250mm*25mm $31.15lm
Rough sawn American Hard Maple 150mm *38mm $31.21lm
Now Even though I wont be using this solid timber prices for veneer ill be using them for solid timber for legs, rails, edgings etc.
I aiming thinking of using New guinea Rosewood for the splines and other decorative sections
Rough sawn New Guinea Rosewood 200mm*25mm $18.45lm
Rough sawn New Guinea Rosewood 200mm*50mm $36.90 lm
Now I was thinking of using Ebony for some edging but thats totally out of the question pricccyyyyyy
Rough sawn Ebony 200mm*25mm $416lm
Rough sawn Ebony 200mm*50mm $832lm
I new it was expensive but not that expensive.
Now theses prices are up to date with Mathew Timbers. There contact details are ph: 9264 8222
Fax: 9264 8232 Email is mickm@mathewstimber.com.au (email of the guy who served me)
Mathews timbers are located in Vermont they have their own website which is pretty handy has all different timber species and applications they are used for.
Having a .6mm for the outside veneer will make things a lot easier for the marquetry. will create less sag when putting in the cut out veneer shape and plus wont have to clean out so much. Will explain this further when coming up to process.
No comments:
Post a Comment