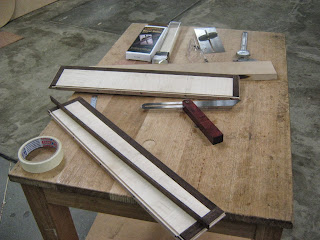
The drawer box division is having a few alterations. Although not that much really. I plan on having wenge inlay strips on the top on both sides. There is no need to have them on the bottom since the drawer guides will block it.
Also I have been considering to change the jointing mechanism. Instead of having one spline I had though of having dowels. Generally the joint is 1/3 smaller than the thickness of the panel. So the dowels would need to be 4mm in diameter.
Made stop cuts on the panel saw. I made the depth of the cut to 2mm. The inlay will be 2.5mm thick. This top cut is to prevent chip out when I remove the rest of the waste sections on the upside down router. This is especially need since the grain is changed in direction compared to some of the other inlay rebates I have had to make.
Setting the router bit to the right depth. I only needed to raise the cutter up to 2mm. I first tested it on a scrap piece of MDF first before running it on the actual thing.
Rebates made. I did not bother with a feather board since it was a very shallow rebate and the cutter was not doing that much of work to need it. Even though the feather board is also used to push down slightly bowed parts as well I was able to get an even rebate without it even though the panels were slightly bowed a bit.
Sanding the inlay strips for the inlay rebate sections. I was only sanding these inlay strips down to 2.5mm. I just wanted them to slightly stick out a bit where it was going to be easy to clean up with a card scraper. As for the width of the inlay strips I made them to the exact width of the rebate which was 16mm.
Began gluing down the wenge inlay strips into the rebates. The glue I used was tight bond 3, which I brushed on. I masked off some of the veneer near the rebate with blue painters tape to prevent glue going onto it. I did one side at a time when gluing up. I used baking paper to prevent the clamp cauls sticking to the inlay strips. Also the clamp cauls were also used to prevent the clamps from damaging the timber and also spreading out the clamp pressure evenly.
Clamped up and will need to be left clamped up for about 2 hours.
Cutting the front sections to size. Both ends had to be cut at 65 deg. This meant that I had to set the angle of the blade to 25 deg.
Front angles cut.
Before doing any of the finishing cuts I did the cuts on some scrap. These were the tools I used for the job.
An adjustable protractor and a bevel square.
For the back angles they needed to be cut with my circular saw. I could not use the panel saw since this angle has to be 43 deg which means I would have to tilt the blade to 47 deg. The max blade tilt is 45 deg.
I used the digital angle gauge to see how well the tilt was on the saw. Even though it said I was out about .5mm I still tested it on scrap to see whether the saw was wrong or whether the digital angle gauge was wrong.
This is where I would like to get the festool drop saw since this also tilts to 47 deg. Its a bit hard getting the panel cut to the right size when using this saw and cutting on an angle. The first angle is easy its just making the second angle cut that is the tricky bit.
Having a drop saw would have sped things up a lot faster.
I got a little bit of chip out but I was not too fust since this was going to be up at the back and you would not really see it.
Glued the chip out section back to it.
The back angles were a little bit out but nothing major.
Panels cut to finished size. How I just need to make the dowel connections add the 2mm edging to the fronts and make the inlay housings for the front and back ends and glue the inlay in.
Making the dowel hole connections on the horizontal borer at tafe.
The sides that were going into the ikebana base/ top drawer base needed to go to a depth of 43mm where the sides that were connecting to the cabinet base and top carcass panel had to go to a depth of 35mm. This is because there were two different thickness panels that these drawer divisions were connecting to.
Making the inlay rebates for the side sections of the front and back. First making the stop cut with the circular saw. Rebate being 2.5mm deep.
All stop cuts made now the major waste sections are ready to be removed.
Top view of the panels.
I removed the waste sections using the hand router.
Left .5mm to the edge of the rebate which will be cleaned out with the chisel and mallet.
All ends machined.
Chiseling out the last of the waste sections.
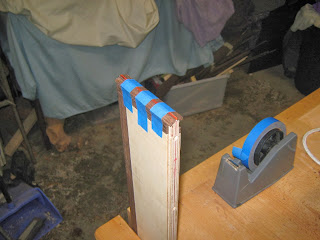
Glued the inlay pieces into the rebates with tight bond 3 glue. This will need to stay in the clamps for 2 hours. I used painters tape to mask sections where I did not want glue to go onto and used pressure cauls to prevent clamp damage to the panels.
Since the inlay pieces extended over a bit from the panels new cuts will need to be made on the panel saw and the circular saw. I hoping later on I will have a drop saw and will be able to use if for this.
These wenge strips are for the drawer slips and drawer runners. These will be sanded down and mitered at a later stage.
Made the spline rebates for the drawer runners. These rebates at 2mm up from the bottom and were 4mm wide and 3mm deep. This were done on the panel saw at tafe.
Removing the over hang of the front and back wenge inlay pieces from the back and front edges before placing the edgings on.
Machining the front edgings for the fronts of the drawer box divisions.
The front angle of the edgings had to match up with the front panel angle which was 65 deg. Well each side made 65 deg together it made an angle of 130 deg. This meant that I had to tilt the saw blade to 25 deg.
I did tests first to make sure that I got the angle I wanted.
Right angled triangle 90-25=65.
There was a gaping under the 'T' fence for the band saw so I added a MDF board to close it off so I could easily rip the wenge edging down. I used the band saw to limit chip out and kick back.
Sadly due to being tired I stuffed up the measurements. But one must improvise.
I measure the external miter width of the edging instead of the internal. This meant that the edgings were 1mm short in width. To solve this and add some feature to it I added 2mm paduke stringy inlay down the middle that I had left over from the drawer box bases, lids, molding.
Cut the edgings to the finished panel width, which was 90mm.
To make assembling easier I super glued the paduke stringy inlay to the wenge inlay piece first. Once dry I than glued the whole thing to the panel with tight bond 3 glue and taped down with blue painters tape and left to dry for about an hour. 80 percent of the curing happens within the first hour.
What the inside section looked like.
Glued edgings to panel and waited for an hour for it to dry. I did not work on it ( planing it) till the next day to make sure that all the glue was dry. The hour mark was just the time I needed where I could take off the painters tape.
Planed down the front edges with a spoke shave so it would be flush with the sides of the panel. The edgings over hanged since they were spanning out on an angle.
All cleaned up. instead of the wenge edgings being 7mm wide they are 6mm wide due to the 2mm wide paduk, sharing 1mm on either side pushing the edging to 7mm.


No comments:
Post a Comment