


http://www.pdxtex.com/canoe/compound.htm
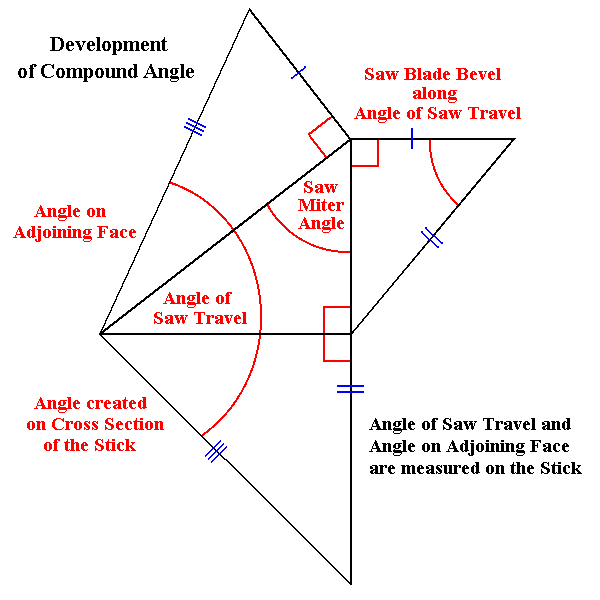
I came across this website that explained compound mitering and compound butt joints. There was a calculator program that helped out with getting the right angles for cross fence set up and blade bevel when dealing with compound angles. It was good that this system of calculations was based on a table saw which is what I'm planning on using to make my compound angles.
I would have like to buy a Festool compound miter saw since cutting and set up time would be a lot quicker but sadly the finances don't allow me to get one for now.
I like taking this as a learning curve since its always best to see how one different machine can do the same job as another.
This calculation function is great but its pointless if you don't understand the mathematical principals behind it. This is usually best if your wanting to come up with results quicker. Although for documentation I do plan on doing the maths for it.
I find that the very top formula diagram is the most helpful some of the other examples I found on line were a bit confusing.
http://www.docstoc.com/docs/25980174/Half-Angle-Identities
This above web site goes more into equations on compound angles and some other things as well that you may find quite useful as well.

Once placing the variables into the calculator program it required me to do a few things.
First I marked out 2 angles on a scrap piece of plywood starting off making an origin point with 90 deg square. I marked the end angle to 65.5 deg ( the end angle is the angle I need to set up on the cross cutting fence. The actual angle in the calculations is 65.438 deg.
The second angle which was for the bevel angle was 23 deg. ( the bevel angle is the angle I need to set up on my saw blade. The actual real angle for this was 22.982 deg.)
Both these angles were marked out with the protractor. Once the lines were drawn I set two of my bevel squares to these angles.
I'm planning on getting more bevel squares its quite useful to have more than one or two especially when dealing with compound angles. Also there is a protractor that is used in conjunction with a bevel square. I would like to get one of these since it cuts set up time in half. Allows you not having to draw the angles down first than setting the bevel square to them.
These angles were for just one of the compound angle set ups for the edging on my doors. There are heaps more compound angles but I just wanted to take the time to talk about this first.
This set up is for the top outer angle for the back doors where the edging is at 45 deg but is sloping at 25 deg.

On my table saw on the multi combination machine its quite limited to what angles you can set the cross cutting fence to. This is where the bevel squares come in handy. Luckily I could reference it off from the back of the cross cutting fence to the support table which is at 90 deg.
I do plan on making some modifications to the combination machine to make it easier for set up, create more support and just plainly make things more easier. Although this probably wont be until final piece is over and I have more time to work on it.
So the cross cutting fence had to be set to 65.5 deg.

On my machine this is where the saw blade angle is made. The saw blade bevel had to be at 23 deg. To make sure the saw is calibrated properly doing a few trials on scrap timber is done first. The saw is quite accurate but I always get in the habit of doing tests now.
 Made cut one test piece and referenced it to the angled panel edges that had been cut on the back doors. The scrap piece was getting some chip out. This blade is a bit blunt and is not as fine toothed. I would be using a razor sharp blade when doing the actual cuts and a finer toothed one as well. Also I would be making a small jig that has a backing board that sits up against the fence. Nothing too fancy just to act as a break point so it doesn't split the edgings with grain break out. I would also be placing blue painters tape over the cut line to further prevent break out as well.
Panel width increased up to 90mm

Panel width increased to 116mm

Panel width increased to 100mm

Will stay at the same width since round up took it above the new required measurement any way.

Panel width increased to 80mm
There are a few things that need to be addressed here. The blade thicknesses for the bandsaw in these calculations will need to be changed. These blade thicknesses were based off the blades I had at work which were ranging around the .6mm-.8mm mark. The large blades we use at tafe for cutting straight pieces of timber when using the T fence are 2mm in thickness. So all panel widths will need to increase.

Riping down one of the maple boards which I will be ripping down in half than cleaning up and laminating it to the wenge pieces.
When I cut the small section I wanted which was 105mm wide from this board there were a few knot section. I will cut around these when the edgings are laminated and are ready to be cut down to the smaller edging pieces.

Riping down the wenge. I will also be riping down this small section down the middle like the maple on the band saw at tafe than will be gluing together once glue faces are cleaned up.

These smaller pieces will also be laminated together but will be a different laminated thickness compared to the above laminates.

Dressed the faces of the wenge on the jointer. This wasnt too any specific thickness it was just done to clean the faces. Again trying to take off the bare minimum with the wenge due to it being really expensive.

I did not dress the maple since I will be doing that at tafe work shop. I want to try and dress and do the rest of the machining than glue up to avoid it cupping again like what happened with the counter veneer stock.
The pieces are just over 1600mm long I decided on doing two lamination jobs this length. I wont bother making the smaller ones I think I will be able to get all the laminated edgings out of the stuff I cut.

Dressing both faces and edges of the hard rock maple piece that was ripped down in my work shop. I dressed this on the jointer at tafe. I used the pressure pad blocks I had in my work shop here since I found it gave really good pressure when running timber over the jointer.

Running the faces and edges through the jointer. I did not want to take too much off the faces more so the maple. The maple tends to split a lot due to its alternating grain so I wanted to leave some extra stock on the maple thickness so if needed to I could run through the wide belt sander at my work.


Once all faces and edges were cleaned up the boards were ready to be ripped down the guts on the sand saw using a pivot jig set up on the 'T' fence.

To limit the chip out when dressing the band sawed faces I dropped the thicknesser to speed 1. The thicknesser needs to be on to alter the speed.

I left the laminates to 9.5mm. The edgings were rapping around 16mm panels. When glued up these laminates would be ranging at 19mm. Although I have left extra for sanding the chip outs on the maple. Even though there is no chip out on the wenge it will also need to be machined down to the exact thickness as the maple as well.

Scored and sanded faces.

I decided not to glue up the laminates yet. I was planning on having the really bad chipped out sections as the glue faces. I decided to stop because if I ripped these later down the track in the joint line you would see chip outs. I needed to make sure that the glue faces had hardly or no chip out. The edgings really needed to be clean since this is one of the features of the piece.
Probably not the best picture but you maybe able to see what I'm talking about with the chip out on the hard rock maple due to the alternating grain.
I decided to get both faces inside and out as clean as possible through the wide belt sander at my work.

Sanding down the laminate pieces. The laminates were actually reading at 9.7mm. This was good since it gave me a little more to play with.

I finished each laminate at 8.7mm a little bit below what I intended but still ok since I still had stock to play with when planing off the waste when the edgings are glued to he panels. Most the chip outs went away there were a few chip out sections but I should be able to work around these sections.
I will access the chip out sections again when all the edgings are ripped down from the laminates.

I would be pressing up the laminates in between some slightly over sized MDF cauls. I just cut some baking paper to prevent the parts from sticking to the cauls.

Scoring and sanding the glue faces. I needed to do this again since the score lines had disappeared from when the pieces were sent through the wide belt sander at work to clean up the chip out sections. I choose the glue faces to be the cuped face. This would making things easier to clamp.

Wenge and Hard rock maple laminates between the clamp cauls.

I did a dry run first to make sure I had enough clamps. Sadly I was a little short which meant I would need to use some of my sach clamps.

Wet the glue faces with water from the spray bottle to kick start the curing process with the polyurethane.

Applying the polyurethane glue to the glue faces. Only one of the laminate glue faces needs to have polyurethane added to it. It is an expanding glue, I probably have used too much here but all well.


Jobbed clamped up and will need to be left for 4 hours plus.


Glue expanding and will cover up any gaps.

Removing the dry polyurethane from the edges of the lamination pieces. This is because it blunts the blades of the jointer very quickly. I just removed it with a wood rasp.

Picking the edge that will require the least amount of work. Cleaning this edge to than be run through the thicknesser as a reference to clean the other edge.

Running through thicknesser to clean other side. I only wanted to clean the edge it did not need to be taken down to any specific measurement.

Cutting the lamination pieces into strips on the band saw. From the band saw 'T' fence to the blade is 9mm. Each cut that is made the lamination piece needs to be taken back to the thicknesser to be cleaned again. This is so there will be a straight square edge that will be resting up against the 'T' fence. Most of the edging will be finishing at 7mm. I have left this much so it will be sanded through the drum sander to get rid of the chip out sections from the maple.
Its best to have some one tail out with long pieces like this that is if you don't have a out feed table section which is what I did not have.

Strips all cut and are now ready to go through the drum sander at my work shop.

Began sanding the laminated edgings through the drum sander to get all the band saw marks off them and the chip out sections. I had left my self enough stock to play with to remove these defects.
The edgings needed to be sanded down to 7mm in thickness for the edgings for the doors and the drawer fronts for the drawer boxes.
The thiner offcuts from the lamination pieces from band sawing measured at 6.5mm in thickness. I was able to sand this down to 5mm and use them for the drawer box sides and back edgings. Although there were only 2 pieces at 1600mm long and I needed a lot more than this for the other edgings for the sides and backs.
So I grabbed some of the other edgings and sanded them down to 5mm in thickness. I had plenty to use i made sure to have enough edgings to do this when beginning the laminating.
Each pass through the drum sander was at .4mm.
The edgings for the drawer box sides and backs also needed to be sanded down to 14mm in width. This is because the sides and backs measured to 12mm in thickness. I wanted to leave 1mm on each face which will be cleaned up later with the spoke shave.

Began cutting the edgings for the drawer box sides and backs to the oversize length. Once these were cut they would be glued to the sides and back panels. I made up a quick little jig that could be broken down.
It required a backing board which acted as a break cut to prevent blow out on the edgings. I also added a piece of timber where the edging could sit on this also acted as a starter cut to prevent some chip out as well. To avoid the edging from kicking up I needed to hold it down. This required my hand getting close to the blade which meant I had to be pretty careful.
I would at some stage like to make a custom sled fence where it will be safer to cut small parts. At the moment I don't really have time to build this.

To cut shorter pieces I had to push the backing stopper ( piece of timber at the right) further out so I could get the stop on the cross cutting fence to where it needed to be. These small pieces needed to be cut at 127mm in length.
For extra support for the base timber piece I had to add another backing stopper the same thickness as the other one and place it on the other side. This is so the base timber piece would not rock and have more support.

Edgings for the sides and back all cut. This includes 8 pieces for the 4 long sides, two each side. 8 pieces for the 4 short sides, two each side and 8 for the 4 backs, 2 for each back. These are now ready to be glued to the sides and backs.
.JPG)
Sanding more laminated edgings but these were for the drawer box lids ( thinner pieces) These had to be 5mm in thickness but still 18mm in width. They will finish to 16mm in width when the over lap sections are planned down to be flush with the drawer box sides and backs.

Each pass through the sander went at .4mm. starting at 7mm than finishing at 5mm. After this cut them to over size lengths before mitering.
.JPG)
Cut laminated edgings to over size lengths for front door flaps and back doors.
.JPG)
Edgings cut to over size lengths for doors and are now ready for compound mitering.
Wider edgings for Drawer Box Lids.

Dressing the wenge and the maple over the jointer and thicknesser before ripping down the guts on the band saw.

Ripped both wenge and maple in half on the band saw. I only need to make one lamination since there are not too many thick edging parts for the wider edgings on the drawer box lids.

Cleaning the bulk of the marks through the thicknesser.

Sanding both faces to get rid of marks through the wide belt sander. This was more for the maple due to the chip out.

I sanded these laminates down to 9mm. They were currently at 11.5mm before going through the wide belt sander.

Scoring and sanding glue faces before applying glue and laminating up. I needed to cut some more clamp cauls and I just used some of the left over baking paper from the last glue up of lamination edging.

Wet both faces to kick start the curing process for the polyurethane glue. Applied polyurethane glue and spread out with a paint scraper.

Clamped up lamination job. First applied some of the clamps lightly to control the sliding and preventing overhang as much as possible.

Glue beginning to cure.

Had to clean the sander drum on the drum sander to get rid of some of the clogged up dust. Wenge tends to block up the belts heaps.

Sanding more of the edging strips that were needed for the drawer box fronts.

Cutting the edgings to oversize mark before gluing to the drawer front panels.

After cleaning the polyurethane off the laminated pieces for the large edging pieces for the drawer box lids and cleaning the edges on the jointer and thicknesser I began cutting them on the band saw. I set the band saw from the fence to 18mm. These large edgings will finish at 16mm width. I wanted to leave a little bit of extra stock to sand off the band saw blade marks and also the chip out sections from the jointer on the maple due to the alternating grain sections.

Began sanding the edging strips down in the drum sander for the drawer box lids. I wanted the edgings to finish around the 18mm mark in width. The drawer box lids were 16mm in thickness and I wanted about 1mm of over hang on each face. The edgings were 5mm wide except for the large bottom sections which were 16mm wide.

Cutting the edgings to over size to than be mitered.

I had to clean and replace the sanding grit belt of the drum sander since the old one was too old and clogged.

Making a small 45 deg bevel on the edgings for the doors. The door panels will also have a small 45 deg bevel on them as well but I will be doing this by hand. The wenge veneer blows out a lot and I don't want to risk this.

I was not too worried about the wenge from braking out since it has quite and even grain it was more the maple since have an alternating grain. Although it is a small bevel and it probably would not break out at all even with an alternating grain.
I set up the 45 deg beveled router bit in the upside down router at tafe. This router bit had a bearing to use. I moved the fence in as close as I needed to limit the amount of router bit exposed to make things safer.

I needed to cut more edgings for the Ikebana base/ top drawer base panels and also the front door flap fold line sections. I cut this edgings out of the wenge scrap that was from the legs.

I first had to get a reference point to use on the 'T' fence for the band saw. So for each cut I had to run the stock piece over the jointer to get a clean face.

Once I had cut all the large strips down to 9mm I had to thickness them down to 8mm. The roller teeth are quite aggressive more so when you taking off 1mm or less. So I decided to top at 8.5mm and sand off the rest through my drum sander.
After this I band sawed them into 19mm width strips. This would than be sanded down to 18mm after coming out of the drum sander to clean up the band saw marks and any chip out marks.

Sanding the edgings through the drum sander.

Edgings ready to be mitered and glue to the panels. These edgings were for the Ikebana/ top drawer base panels.


Placing 45 deg bevel on the front fold line edgings for the front door flaps.

There is going to be a lot of different set ups and its probably going to be best if I invest in a compound miter saw.

Matching all the edgings to the panels.


The bottom edgings for the doors needed to be sanded down to the panel thickness.
http://www.youtube.com/watch?v=GH6BPqnV89M
Just bought a festool compound miter saw and thought this was useful to watch to see how to use all the functions since the manuals are crap.
No comments:
Post a Comment