
Began measuring out the templates for the centre rail, front rails and side rails for the cabinet.

Front rail all cut out. The holes will be drilled in first before the curves are cut out.
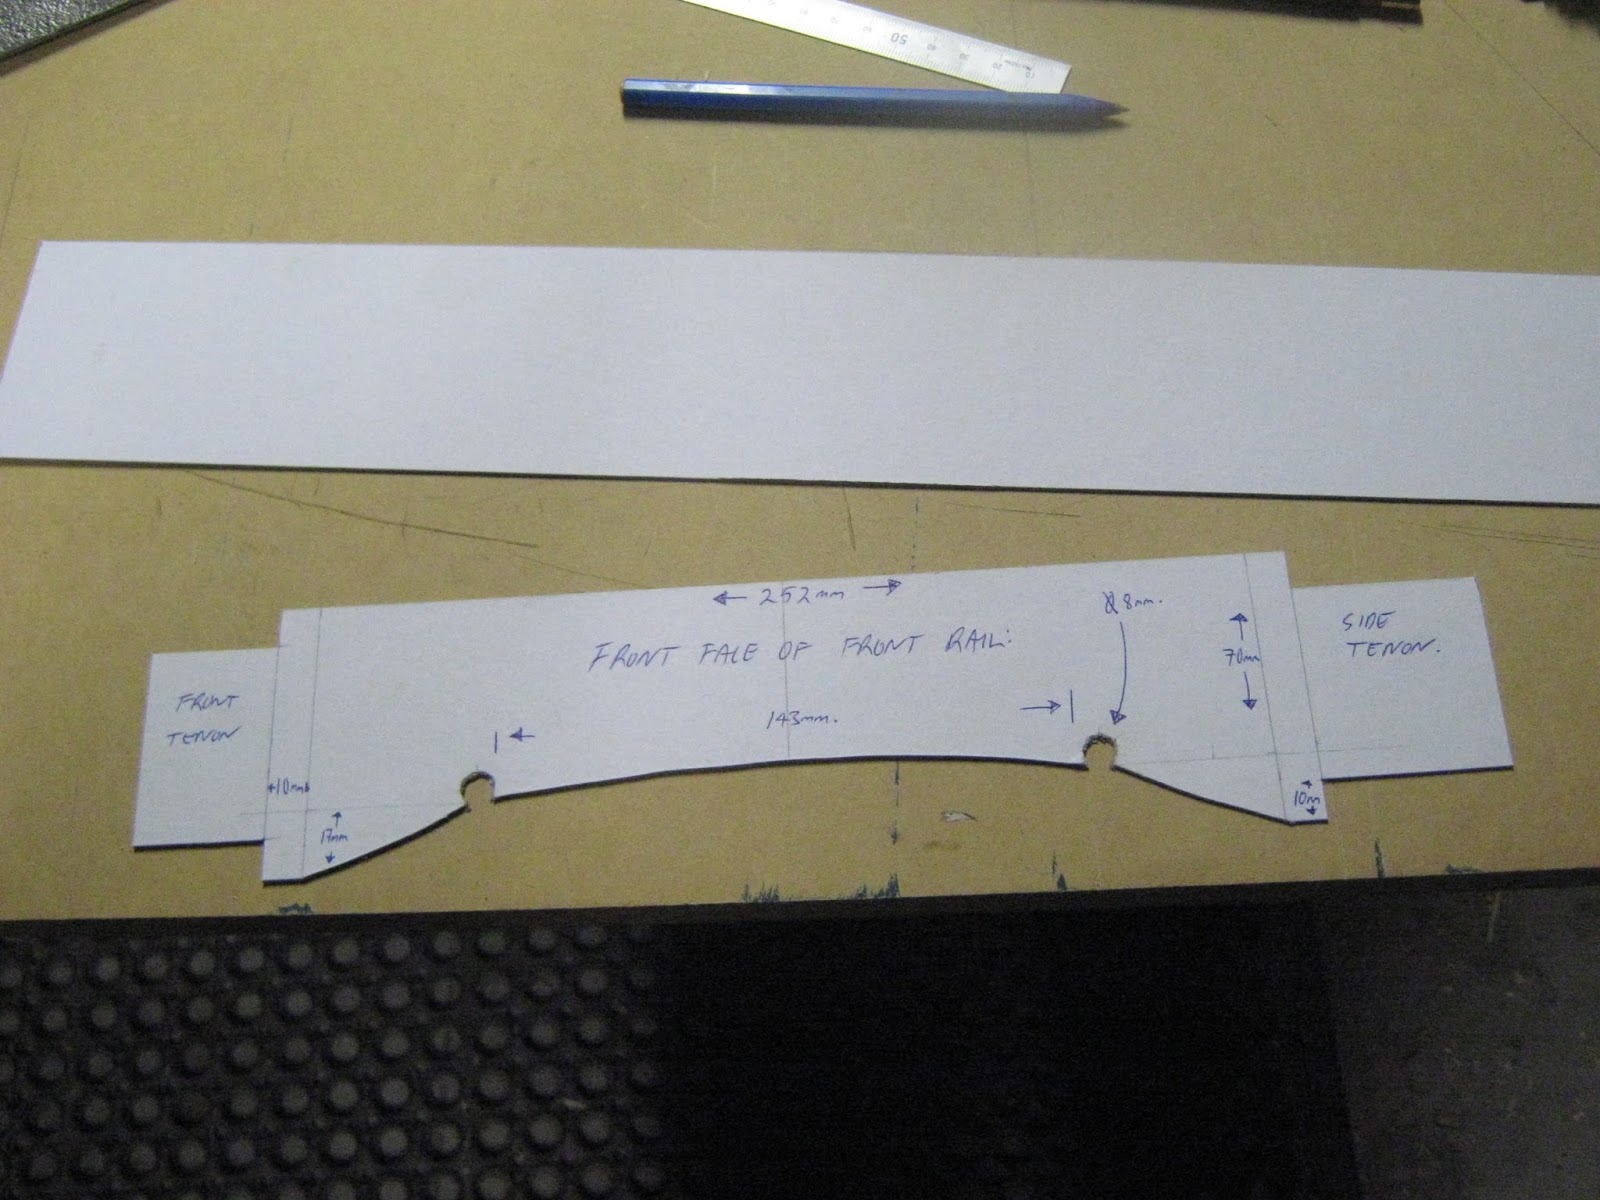
Wrote out some of the important measurements on the templates. Also placed some notes on the back of the template that will need to be though about when machining up the parts.

All rail templates made and are ready to be transfered to the wenge timber stock parts.

Began rough docking the wenge timber for the front, center and side rails for the cabinet. I used up some of the offcuts that were left from when cutting the material for the leg laminations.

I decided to keep the side rails longer since it would be best to dress the faces than cut off the off cut. The wenge is really expensive so it would be best to keep as much as possible and try to keep the waste to a limit.

Dressing the faces of the wenge for the rails over the jointer.

Ran the wenge through the thicknesser after running it over the jointer. The finished size for the rails is 22mm. I finished these parts through the thicknesser at 23mm. The rest I'll sand down through the drum sander.

I have not ripped the parts yet. I don't want to rip them on the saw since I will loose 3mm due to the saw blade thickness. I decided on waiting till I go back to tafe or when my band saw comes in to cut them down on the band saw. This will safe timber. I still need to dress the edges. Before running on the band saw I will dress one edge than cut the parts on the band saw using the 'T' fence. I will make the cut at 71mm than finish off the last 1mm on the jointer.

Due to the wenge being so expensive was really important to try and waste as less as possible. Before cutting the rails to the right width on the band saw the reference edge needed to be dressed on the jointer. I decided to dress both edges so there would be a straight square edge on the off cut as well.

Cutting the rails to size on the band saw using the 'T' fence. This blade was 1mm. I would be creating less waste by cutting on this. If cutting on the saw I would be losing about 3.2mm.
I cut the rails to 71mm on the band saw. The finished width needed to be 70mm. I wanted to leave 1mm that I could take off when running through the thicknesser this is so I could clean up the rough edge from the band saw blade.

Running the rails through the thicknesser. The thicknesser was out by about .1mm which was pretty good.

Sanded down the rails to 22mm .5mm on each face.

Set up the mortiser to make the mortises at the ends of the middle rail. The mortises were 8mm in with and 30mm in depth. The length of the mortises were 53mm. The face shoulders were even. As for the edge shoulders I had the top shoulder at 12mm where the bottom shoulder was 5mm.
I did tests first on some scrap timber I had in the work shop at work.

Needed to make sure that the stop fence was square so that the mortise would run straight into the rail.

Mortise made in the rail. Before making the mortises in the sides of the middle rail I cut the rail to its finished shoulder length which was 351mm.

Making the cabinet button mortises in the sides of the middle rail.

The cabinet button mortises were located on each face. The mortises dropped 13mm down from the top edge and were 55mm in length. The width of the mortises were 6mm and they were 8mm deep leaving 6mm walling in the middle between one another.
The cabinet buttons were going to be 50mm long allowing the button to shift with the cabinet during the seasons.

Drilling the decorative holes for the design shape. These holes were 8mm in diameter and went right through to the other side. The holes needed to be made first before band sawing out the shape.


Transferring the shape of the template to the middle rail. You only need to use one half of the template than flip it over this is so you can make sure that both ends are the same. You just need to drawer the shape to the axis point than flip over.

Cut shape out on the band saw.

Made a little mistake the depth of the mortises were a little bit too deep and showed up when the shape was cut out. This wont matter too much I will use wenge for the floating tenons for this joint and shape it out. Its on the under neath side and in the middle so it wont be highly noticeable. But it was probably good that I made this mistake on the middle rail as I would not want to make this mistake on the front rails or side rails.
I will have to change the shape slightly for these rails so they mortise doesn't show up. I still want to keep the mortise to a 30mm depth to make sure that the joints are strong.


Began shaping and cleaning up the rail with spoke shaves, files and sand paper.

I wanted to create a curving appearance to the under neath hole section to the rail.


Placed up with the legs to see how the shape would look like.

Setting the saw tilt to 65.5 deg to cut the front miter on the front rails. The angle gauge I don't off 100 percent I tend to work with the protractor as well to double check. Before making the cut on good stuff I do the cut on some scrap first until I get the result I want.

The angles for these have to be pretty accurate. If one of the miters is out by even .5 deg from a span of 250mm-300mm it can knock out the measurements by 3-4mm.

To avoid getting blow out I taped the exit cut section with some blue painters tape.

The front angles are cut on the front rails. This means that the miter shoulder lengths are cut to the right length. Tweaking might need to happen when the dry run is made, meaning I might need to re cut the angles again since I think my protractor might be a little bit out.
I will be buying a festool drop saw later on which I will be able to get better angles with it than my current saw.

Double checking that the combined miters for the front of the rails add up to 130 deg.


I drew a line on the mortise to act as a bring back reference depth point for the mortises. Because of the miters the mortise depth stop had to be moved all the time. The mortise depth for all the rails were the same though.

Placing the cabinet button mortises into the front and side rails. These were 55mm long, 8mm deep and 6mm wide. They stepped down 13mm from the top edge of the rails. I did not bother setting up stops for these due to the miters. I just eyed them in.

Mortises placed in rails ready to have decorative holes drilled into them and curved shapes cut out.

Drilling the decorative 8mm holes into the rails. These needed to be drilled first than the shape cut out on the band saw.


Band sawing out the shape sections in the rails. These are the front and side rails.
In the original plans the curved shape was different it was closer to the mitered ends. I had to change this due to the mortise cavities. If I kept it the same the curve would cut into the mortise cavities. In the original plans I was planning on using fixed tenons.


Drilling in the dowel locking pin holes. The rails will have floating tenons in them for the connection to the legs. The holes have only gone down into the mortise cavity. They will be further drilled in (into the floating tenon) when construction is done. After this the 6mm dowel plugs will be taped in and glued in with epoxy. Until dry the dowels will be poking out than cut flush when dry with flexi japanese hand saw.

Sanding off band saw marks on bobbing sander.

Routering the bottom edges of the rails with a 6mm 45 deg bevel. This adds decoration but also breaks the edge. I had to be really careful when coming up to the drilled hole aesthetic sections and also the very ends. Some of the ends I had to come in 10mm away from the edge since I could not route it due to do surface area for the router bearing to run on. These sections will be shaped with the japanese rasp I bought.
No comments:
Post a Comment