
Began docking the wenge to size for the laminates for the legs of the cabinet. In total there will be four legs. There will be two lamination jobs each job will obtain two legs.

The wenge I picked from the timber yard was quite good there was hardly any checks and the boards were quite straight. The cutting here is just rough cutting. I have given my self enough to play with when docking after lamination and squaring off the edges after lamination.

I started getting what I needed out of the shorter boards than worked towards the bigger boards. I was able to use one piece from the bigger board than rip in half. Each lamination board was 900mm in length. After lamination the boards would be cut to 880mm. This measurement still comfortable allows the leg to sit in the measurement parameters and be cut out.

Before running over the jointer than thicknesser to sqaure faces need to rip boards down to the lamination widths. The lamination widths was 180mm. The off cut sections I would be using for the rails and other smaller parts.

Ripping boards down to 180mm widths.

Boards ripped down now ready to clean faces. Each lamination will be three boards. At rough sawn the boards were 25mm in thickness. The legs needed to finish at 60mm. I knew that some of the thickness in the boards was going to be lost when running over the jointer and thicknesser.

Running wenge boards over the jointer. First I did the rocking test to see what was the straightest face. The straightest face I would be running over the jointer first. To test this place the board on a very flat surface I just use the infeed or out feed tables of the jointer or the saw table plate. Try and see if you can rock the board at each point with your fingers. The face the rocks the least shows that this will be the face that will require the least amount of passes over the jointer.

I did not realize how easy the wenge was to clean up. I pretty much only needed to go over the jointer either 1 or 2 passes. Plus I picked the very straight stuff from the timber yard. But when looking through the timber yard it seemed that most of it was pretty straight any way. It seems that wenge doesn't really shift that much.

It was the same with thicknessing. I only needed to place it in one pass taking off about 1mm. The waste is very fine dust particles unlike the hard rock maple where its small shavings.

Choosing the best faces to be the outside faces of the laminates. There was this really weird white spot defect I was seeing on some of the boards which I wasn't really fond of. I decided to place these faces that had them in the inside so they wouldn't be seen at all.

Reversed the end grains so it would limit shift in the laminate.

Made a triangle and number the laminate parts on the edge. This would allow me to know what faces I needed to score and sand plus apply glue on when pressing up so there would not be any confusion.

Sent the laminates through the drum sander to sand the glue faces to get rid of the small ripple marks caused from the machining. Doing this would make a far better glue joint since it would make the boards even more flatter plus also sanding it would open up the poors. I ran the boards through the drum sander on the glue faces a few times only taking off about .4mm each pass.

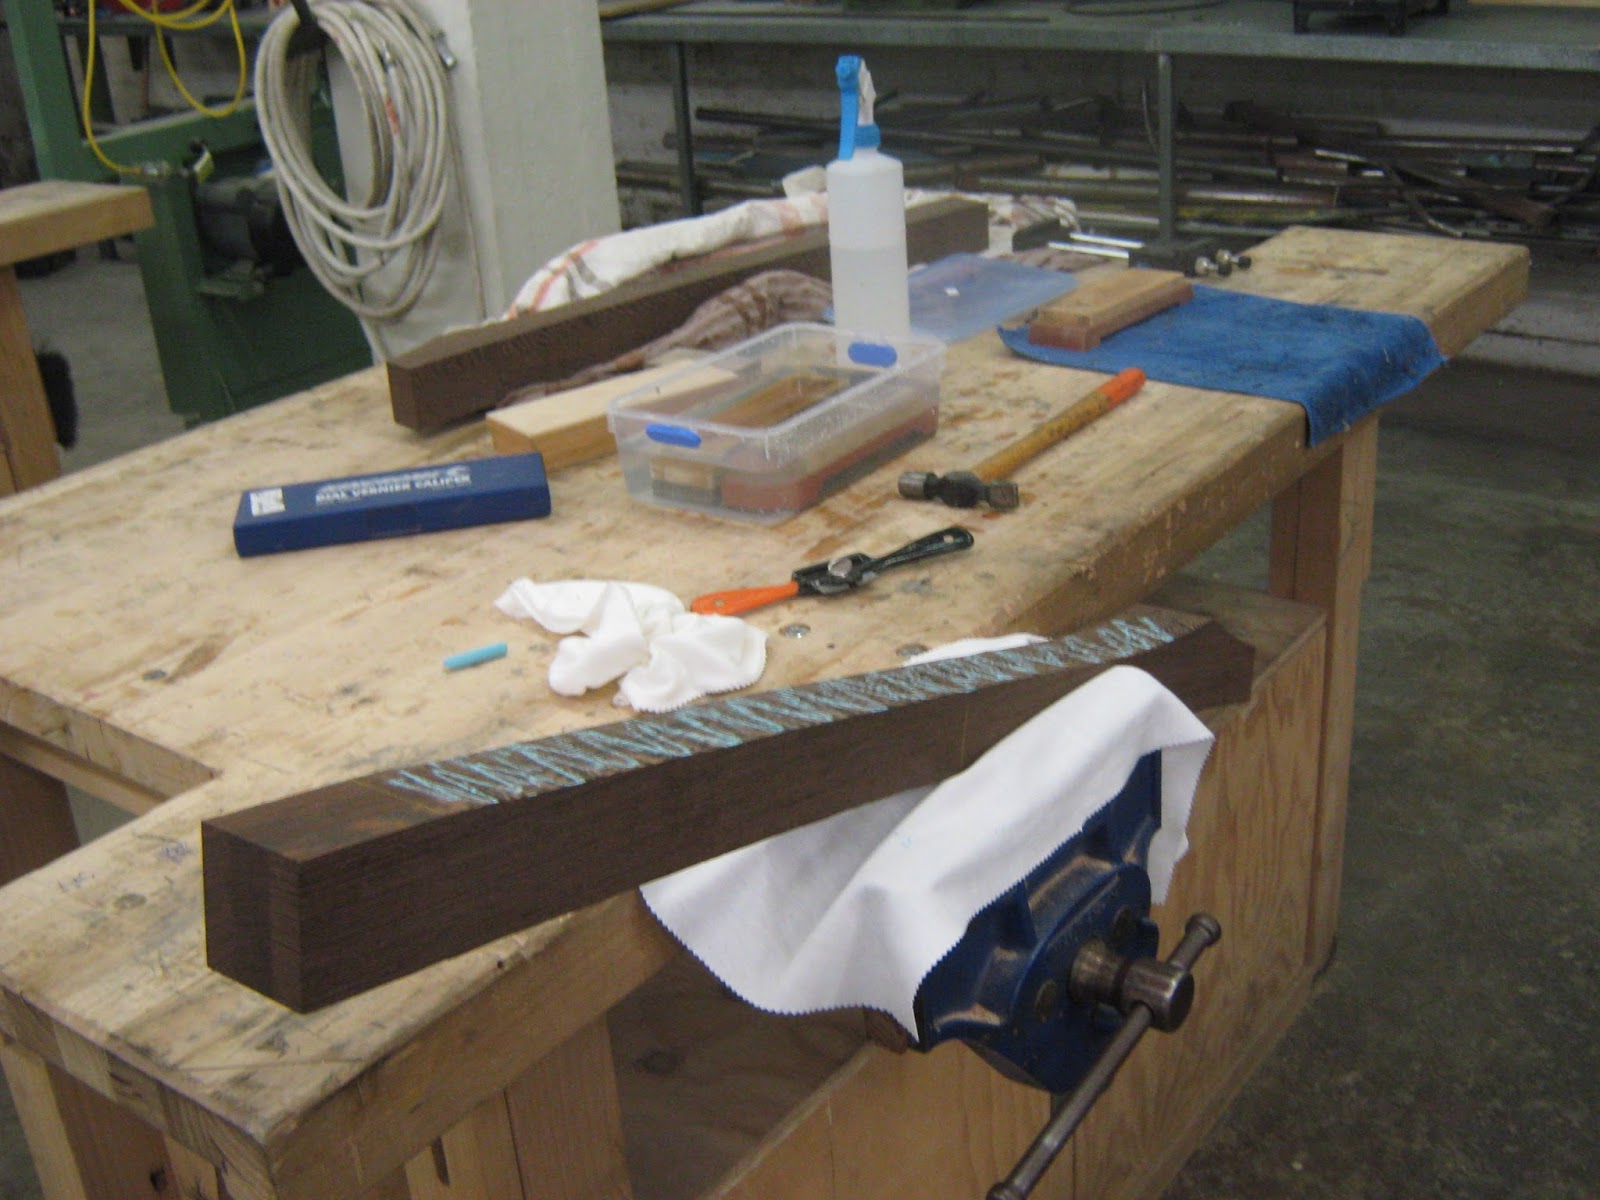
Scoring the glue faces with the sand saw to create an even better glue joint. Also lightly hand sanded with 240 grit to get rid of any burrs that were caused from the saw teeth.

Cut some 12mm MDF to 900mm long by 190mm on the saw. These were going to be used as clamping cauls for the pressing of the laminates.

Doing a dry run with the lamination job to see if it was going to go together properly.

I did not have enough 'F' clamps so I had to use some sach clamps.

Sprayed water down on each glue face from the spray bottle than applied the polyurethane glue and spread out with a plaster scraper. Applying water would kick start the curing process.

Applying water and glue to the next face.

Placed between cauls and now is ready to be pressed up.

Laid down some paper towel on the bottom caul to prevent it from sticking to the laminate job.

I probably didn't need this much glue since it is an expanding glue its just I wanted to make sure that I was going to have a really strong glue joint.

Moved off work bench since needed to use it to make some other things.

After 4 hours were up. Took the lamination job out of the clamps and began the next clamp up job for the second wenge lamination. Sprayed water down first on the glue faces to kick start the curing process.

Spreading out the polyurethane glue with the painters scraper.

Job placed between cauls and ready to press up in the 'F' clamps.

Job clamped up and now need to leave it for 4 hours.

Needed to remove the dry polyurethane from the laminate jobs. I did not want to run this over the jointer and thicknesser since the dry polyurethane blunts the blades a lot. I decided on using my wood rasp to remove the dry polyurethane. It came off quite easy. The clean up doesn't need to be perfect just needed to get most of it off.

Cleaning up the other side.
Consideration of router jig for legs
I have been considering to either invest in making two different upside down router jigs to clean up both sides of the legs. I have also been thinking whether this maybe a waste of time since I only have 4 legs and it maybe worth while just investing in a large spoke shave some curved card scrapers and some more sharpening stones.
The sharpening stones are merely to just get a better finish with the spoke shave on the wenge.
http://www.carbatec.com.au/waterstones_jan_schilling
I found this to be a good info section on some Japanese water stones.

Making the side template for the cabinet legs.


I just cut it out with the Stanley knife.

Locked the template between two pieces of timber and place in bench vice. I sanded the ends since they were slightly a bit uneven. It wont be that bad when transfered onto the leg since I will be cleaning the faces with a spoke shave and doing it by eye.

Cut out the template for the front section of the leg.

I had thought about making two different jigs for the cutting the edges. But with some extra thought I believe this maybe a waste of time putting in the effort for making the jigs.
There are a few reasons for this.
1. I only need to do four legs and some times doing things by hand is a lot faster. Also this will increase my hand skill as well as eye.
2. The straight cutter may not be the right height that I need. I need a straight cutter that is going to be higher than 60mm and this is not including the bearing. This means I would need to hunt one down and probably have to purchase it if work or tafe doesn't have it.
3. I don't have a upside down router table neither does work. So I could only do this at tafe. I could make my own but that is than putting more effort into something that I'm only making a few parts for.
4. A lot of time would need to be put into these jigs. A jig set up would be worth it if I was doing a lot of these cabinets or using this similar leg for other pieces.


Began running the leg laminations over the jointer to square up the edges. The edges needed to be squared up since I would be cutting the offcut sections off on the band saw. Again trying to save as much wenge as possible. The laminations were 72mm thick and the widest point of the legs needed to finish at 60mm. This meant that the two outside laminations needed to be in equal thickness. So I had to take off even amounts on either side when cutting the offcuts off on the band saw.
I needed to think about how much I was going to loose in machining.
- 2mm would be lost from the band saw blade thickness. ( this includes cuts on either side)
- 2mm for dressing the faces. ( 1mm per each face)
- 8mm offcuts ( 4mm on each side)

Cleaning up the other edge through the thicknesser. There wasn't really any specific finish width I just wanted to clean up the edges. Although it had to stay within a specific measurement margin that would allow me to be able to fit two leg sections in from the leg template.

Docking the ends, again not cutting to a specific size just taking off the minimal amount to clean the ends.

Currently the laminations were at 72mm thick. I had to slice off even amounts on either side to try and save as much of the wenge as possible. Taking off even amounts will make the whole lamination structure more balanced.
I actually didn't have much taper on the small laminations plus the actual main lamination section.

Most of the laminations were finishing at 61mm. I had to first clean one of the faces over the jointer. I dropped the infeed table height to about .3-.2mm in cutting depth. I wanted to take off as least as possible.

Once I had one face cleaned I needed to mirror the other face through the thicknesser. One of the laminations finished at 60mm where as the other one needed to go down to 59.6mm. I decided to take down the other one to this thickness as well to keep everything the same.
I was only taking off stock in .3mm passes again trying to take off as least as possible but also taking off this much would give a lot better finish.

I decided to clean down the thin laminates that I cut off the large leg laminates. I finished these laminates around the 3mm mark. I had to use the sled in the thicknesser. Using this sled makes thiner pieces go through it easier. I was only taking off .3mm each pass to avoid break out. I also fed the laminates into the thicknesser on an angle. I did not need to drop the speed like I had to do with the maple laminates. The grain structure is a lot different to the maple. The thicknesser had to be dropped in speed for the maple due to the different grain directions that ran through it where as for the wenge its grain structure is quite straight.

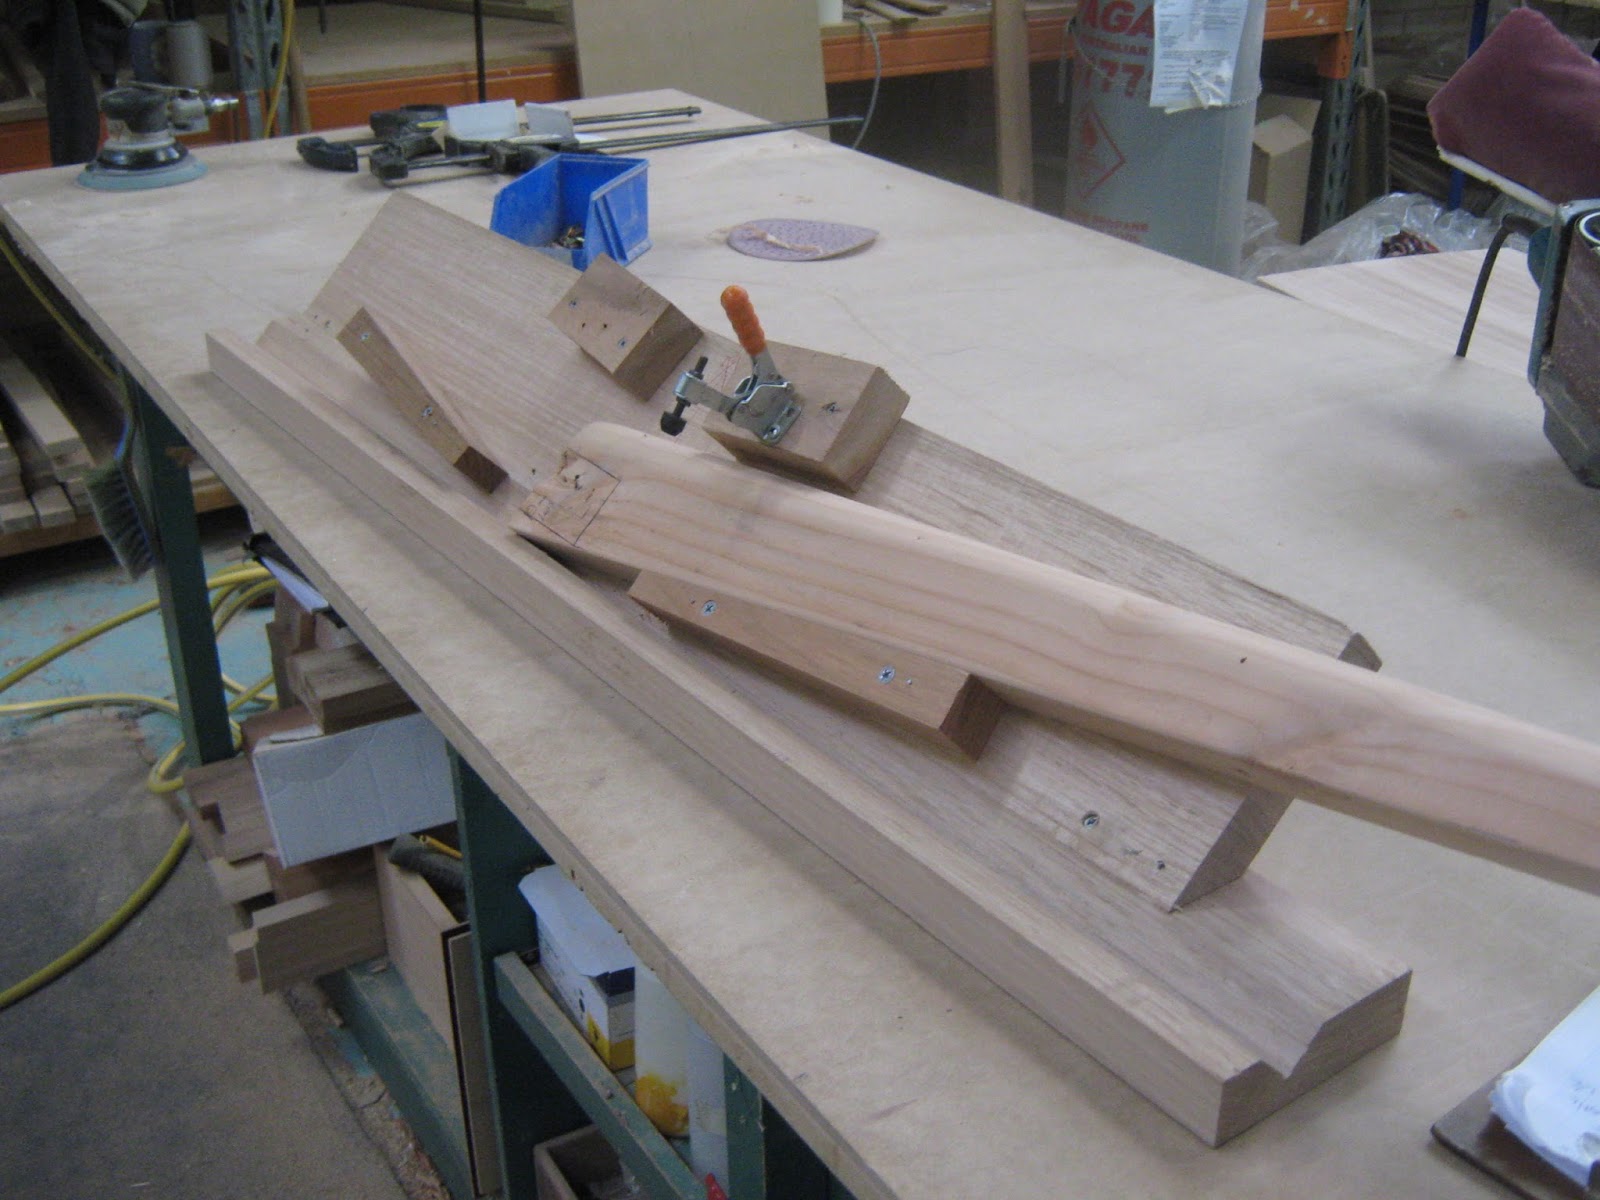
Making out the legs onto the lamination pieces from the template.
Now If I was to do this again I would not make the legs in this process. I would actually make separate laminations for each leg.
In this process the legs have to be cut out in specific steps. The first lamination was 176mm wide this allowed me to pretty much place both legs next to one another pretty closely. The other lamination unfortunately was not as wide. This meant that the legs had to be offset from one another in height placement.
The front leg and the back leg have a centre rail connected to one other on the inside face. This meant that the connection faces had to be really clean. The curved kick out point at the bottom of the legs are placed inwards. So I placed the front leg and back leg inside connection faces to the outside edge of the laminates. I did this since I know what these faces are already square and clean.
The other sides ( besides the faces for side and back rails) didn't need to be 100 percent square since no rails were going up against them. These faces were the front faces that were facing away from the cabinet.
The legs start off straight for 70mm than they start to taper and curve. I wanted this first 70mm to be as straight and sqaure as possible.


To get a square bottom/ top I will need to separate the legs from one another in the lamination but not taking off the off cut sections to the outside edge. This is so I can use these outside edges as reference points when cutting off the off cut sections at the bottom on the table saw and also top. Once when the legs are than cut to the chosen height than I can band saw off the other off cut sections.
These off cut sections will all be kept since they will be able to be used for other parts in the piece like cabinet buttons, edging and etc.

I decided on using the band saw since it was only doing a 2mm cut compared to the table saw where the blade is a lot thicker. I used the T fence so I could get a straight square cut line. I did test cuts on scrap pieces of MDF so I got the exact placement cuts right between the legs.
Now that this is done I can now begin the first separation cut.

Beginning the next cutting stage for the legs on the band saw. The two legs in the laminates needed to be separated. The outside section needed to stay in contact since some of the ends needed to be cut off. These outside sections will be used as reference points to rest up against the panel saw fence.

Inside faces cut and off cut sections removed. Band sawed just near the line. These will be cleaned up with the large spoke saves that I just ordered specifically for this job.

Cutting the legs to size. The legs needed to finish at 840mm. Needed to make sure that the cut sections were square.

Now since the legs were cut to length I could cut the rest of the offcut sections off. The band sawed faces now need to be cleaned up. Once they are clean up the 2nd template shape will be transfered to these legs to create the front taper which will also be cut on the band saw.
Began planing down the legs internal and external faces that had been band sawn. I used chalk to mark out areas that I needed to take down more than others.

When using the spoke shave you need to go down on an angle to obtain a better shave.
Shaping wenge is quite unusual to other timbers I have worked with. The top face is very easy to plane where the edges are very hard and the spoke shave tends to jump.

I had to keep stepping away from the job and seeing what the curve was like. All the legs are not 100 percent spot on but pretty close. I had to re sharpen my spoke shave blades a lot since the wenge was really making them blunt.

Down towards the bottom of the leg the grain direction changes so you need to change the direction in which your planing the leg so to make sure your going with the grain. As for the very bottom your sort of going into end grain so this is where the spoke shave doesn't help much but is when the rasp comes in handy.

Really loving the strong grain pattern that the leg is giving off has that sort of zebra striped look to it.


There is a slight difference between the legs but not that much to highly notice. Once the second taper and the 45 deg bevel edges are added you wont even notice.

First taper now has all the band saw marks removed from it after planing it with the spoke shave.

I found that there were still some bumps and ripples left over from the spoke shaving. I at first used the card scraper but was taking too long. I decided on using some of the 37 grit drum sander paper that came free with my drum sander. I would not use this since for the drum sander its way too abrasive.
I just ended up cutting off some and attaching it to a corner block with double sided tape.

After about 10 passes with the 37 grit sand paper the ripples and bumps were pretty much gone.

I placed the legs onto the life scale drawing to see where I needed to place the mortises. I wanted to do the angled mortises first before doing the 2nd taper. This is so it could fit into the angled mortise jig that I planned on making. Ideally to make machining easier I should have left he legs in individual rectangle blocks, done the mortising than do the shaping.


.JPG)

.JPG)


Using the japanese rasp to place a a bevel on the bottom of the legs that could not be down with the hand router. I only just bought this rasp but I would have to say this is the best wood rasp I have used.

I machined the 45 deg bevels on the maple feet using a jig I made that would be used on the upside down router table. I needed to have a jig to hold the pieces since they were too small and dangerous to machine by hand. There would be a high chance that the pieces would go into the router bit cavity if doing them by hand.
The toggle clamp was the best option to hold down the pieces down securely.

Machining the small 45 deg beveled edges on the top and bottom edged sections of the maple feet.

Drilling in the connection dowel hole. This hole was 10mm in diameter and was 7mm deep.

Maple feet all made and ready to be sanded. They will be glued to the legs when the assembly for the legs to the rails are finished.
No comments:
Post a Comment