
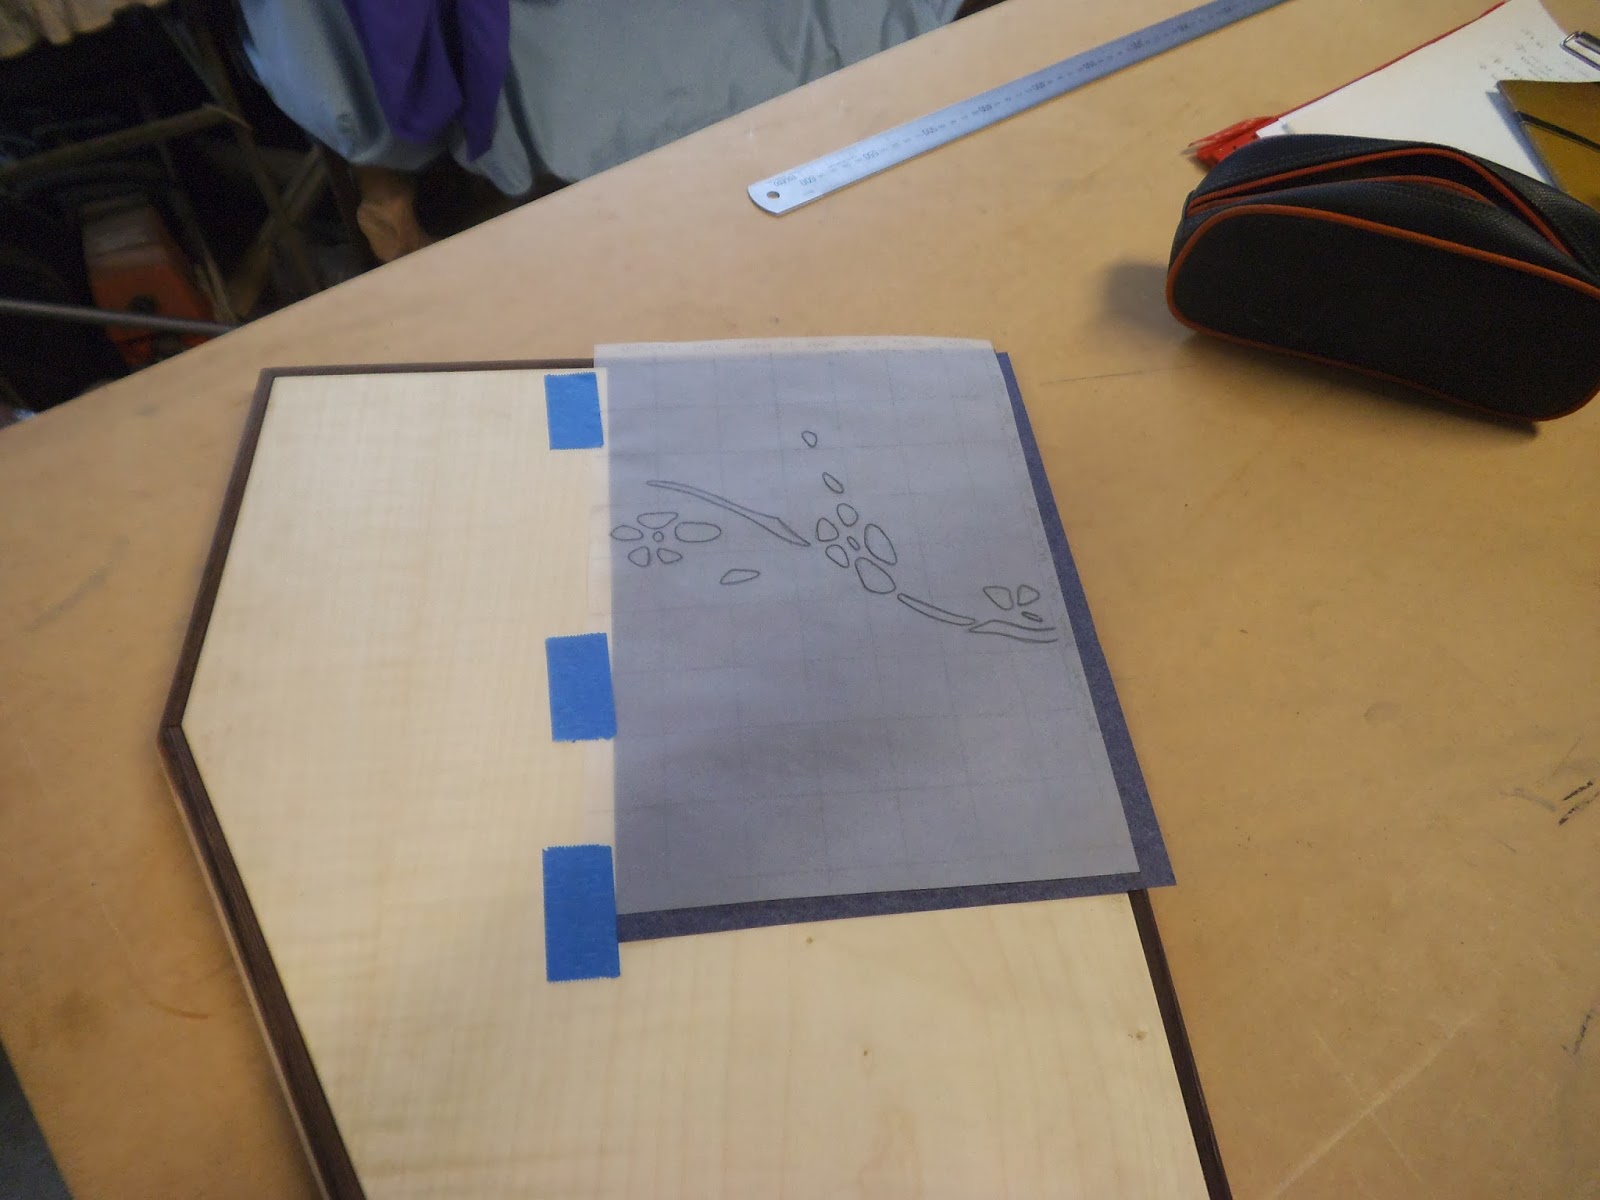
Started to drawer out the panel shapes and drawer in the box grid for the sakura inlay patterns. The boxes are 30mm by 30mm.
Now I just cant put the patterns any where I want there is specific placements that they have to go in.
You don't want to add to much since you will make it look to busy also you don't want to make it too complicated since it will be too difficult to machine.
I want the tops and sides also the doors connecting together, ie the branches of the sakura running into the next panel, everything matching up. Also some of the inlay ( ballon flower) needs to go in specific areas. The Ballon flower inlay is the inlay thats going on the maple veneer sections. I don't want the inlay to be blocking the main vocal point of the 'V' groove book matching.
Some of the panels will be repeated just mirrored ie the sides, ikebana base/ top drawer base doors etc.
I was asked why don't I cnc it, but where is the fun in that.
Seriously It would take a lot more time. You would need to make multiple separate jigs. You would need to do a lot of programing, you would need to do tests on MDF first too see if its going to work, ie tool heights machine speeds etc etc.
The inlay sections are quite close to one another and I know there would be a very high chance of blow out if I did them on the CNC. Using the router I have more control.
You would need to make sure suction is really good in your jigs.
CNCs don't tend to like splines especially the 5 axis Biesse which is the one we have at tafe. Also with the amount of usage its getting with the other students trying to do their projects I would hardly get time on it.
This would only be beneficial if I was doing really really detailed stuff of if I was doing multiple repeats.

Cut off 400 mm from the main paduke slab. I would be cutting this into 4.5mm veneer layers than sanding them down to 2.5mm thicknesses.

Decided to also cut some redgum as I would be using this in the inlay as well to create a contrast between the paduke and also decided to cut some more maple. I have some maple thin sections left over but not enough to complete the router based inlay.
I also plan on using some american beech which I have this already in 2mm thin pieces from a past project. I had though about using the wenge as well for the branches in the maple faced sections but now when I think about this this will create major problems. The wenge will easily stain the maple when sanding. I might use the red gum or some other brown timber in the maple faced sections.
The red gum is more of a dull brown so wont stand out too much in connection to the paduke.

Dressed faces and edges first over jointer than ran the other sides through the thicknesser.

Slabs made into 4.5mm veneer sheets. I cut all these on the band saw.

Out of all the timber I thought that the red gum was going to be the most annoying to cut due to being really dense. It actually wasn't that bad the worst timber to cut was the paduke. The paduke is quite soft but since there is a lot of heat build up between the blade and the timber it turns the paduke dust into a fine putty wax which sticks to the teeth of the band saw blade which slows down the cutting. The blade is still sharp its just a layer of oily paduke dust is overing it preventing a nice sharp cut.
The maple was probably the second worst to cut but this was more due to its alternating grain structure.
Was each cut was done the main slab section had to be taken back to the thicknesser and cleaned up so I could obtain a clean face again that I could use as a reference to run up against the anchor point on the fence to keep the cut straight and parallel as much as possible to the blade.
Before making the cut I used a marking gauge and ruled a line down the piece of timber. Even though I set th anchor point 4.5mm away from the blade the reference line was still used as a guide to keep to as the blade tends to wonder choosing the path of least resistance.

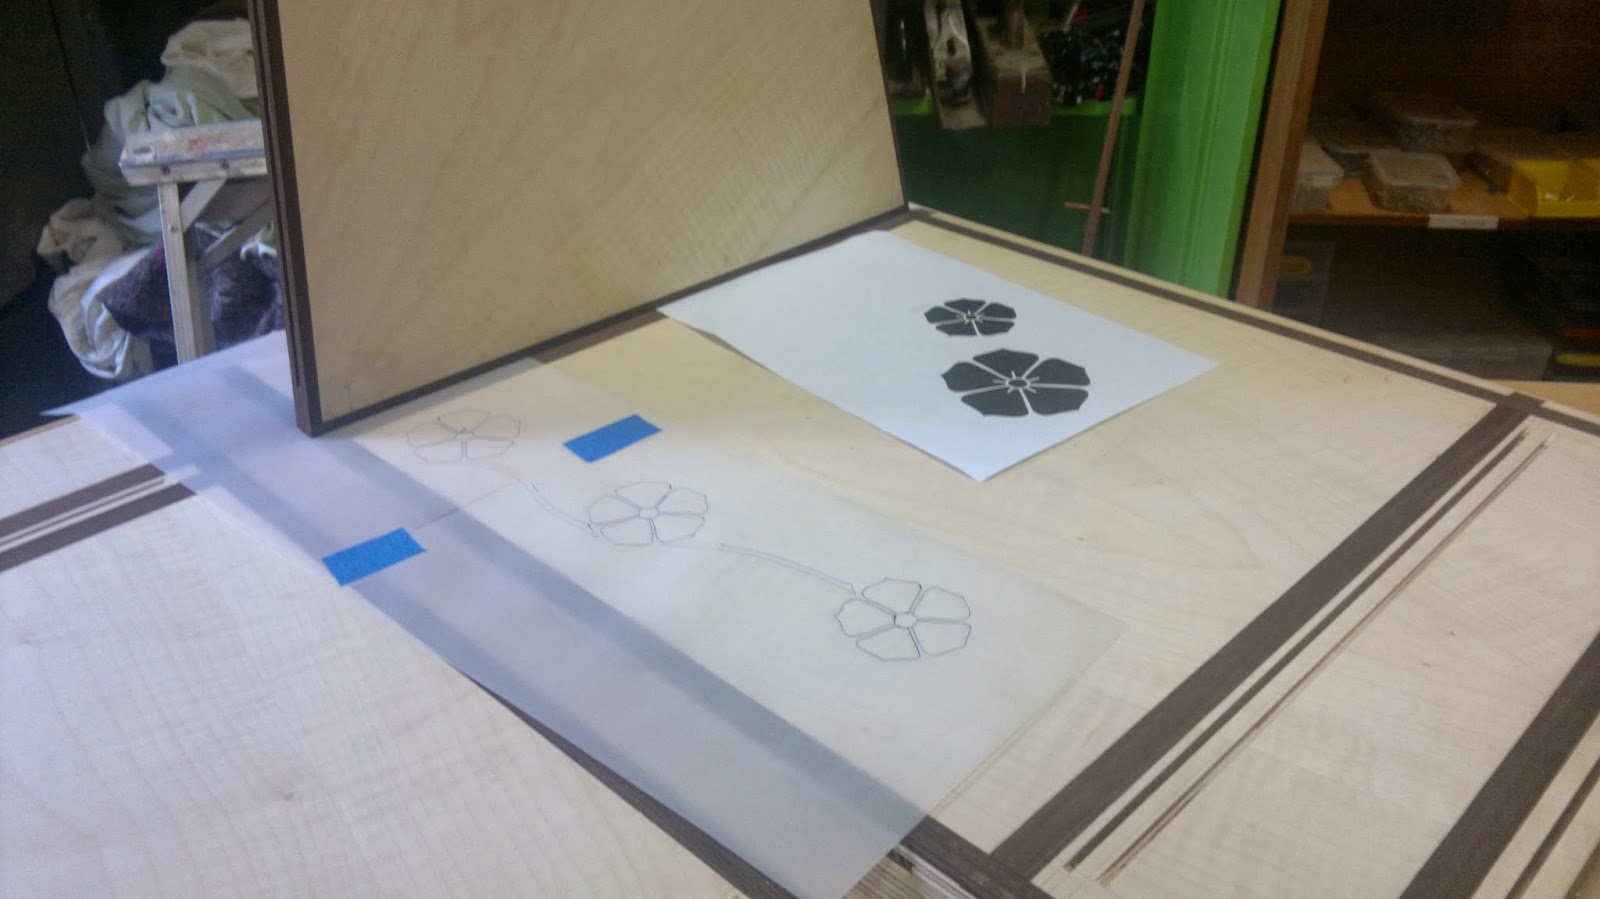
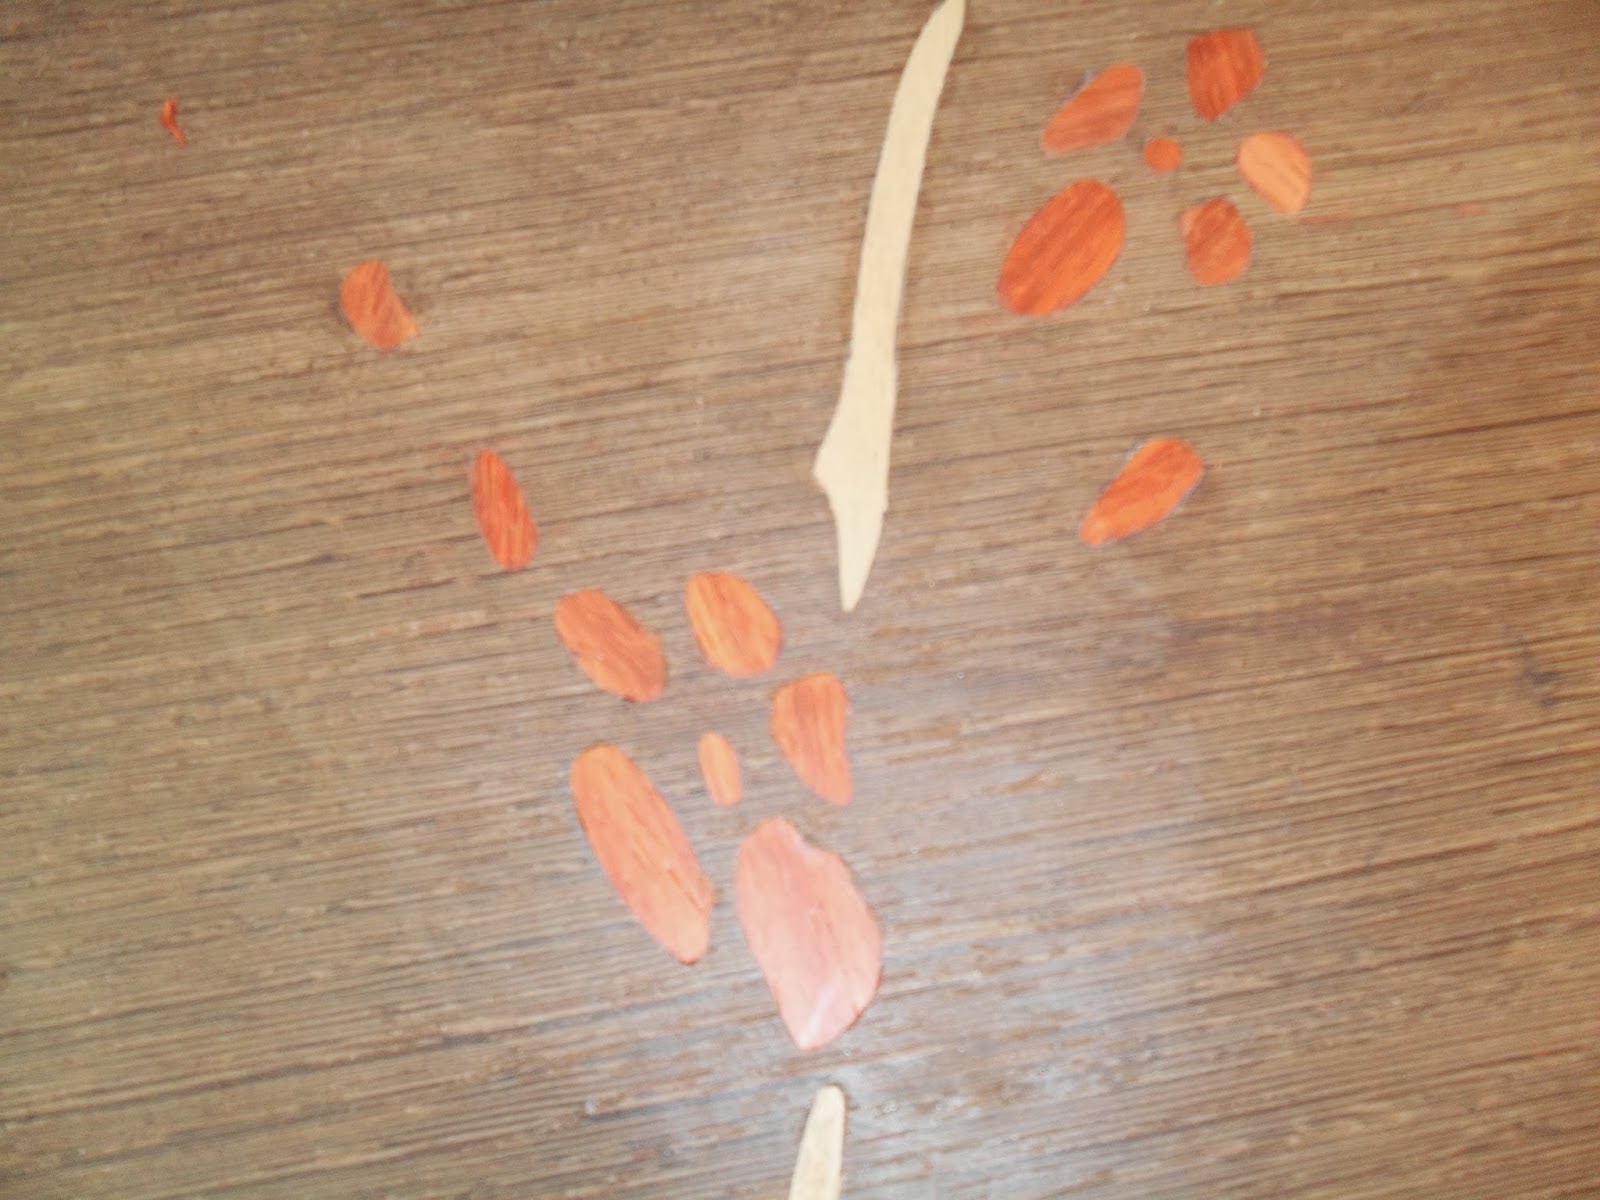
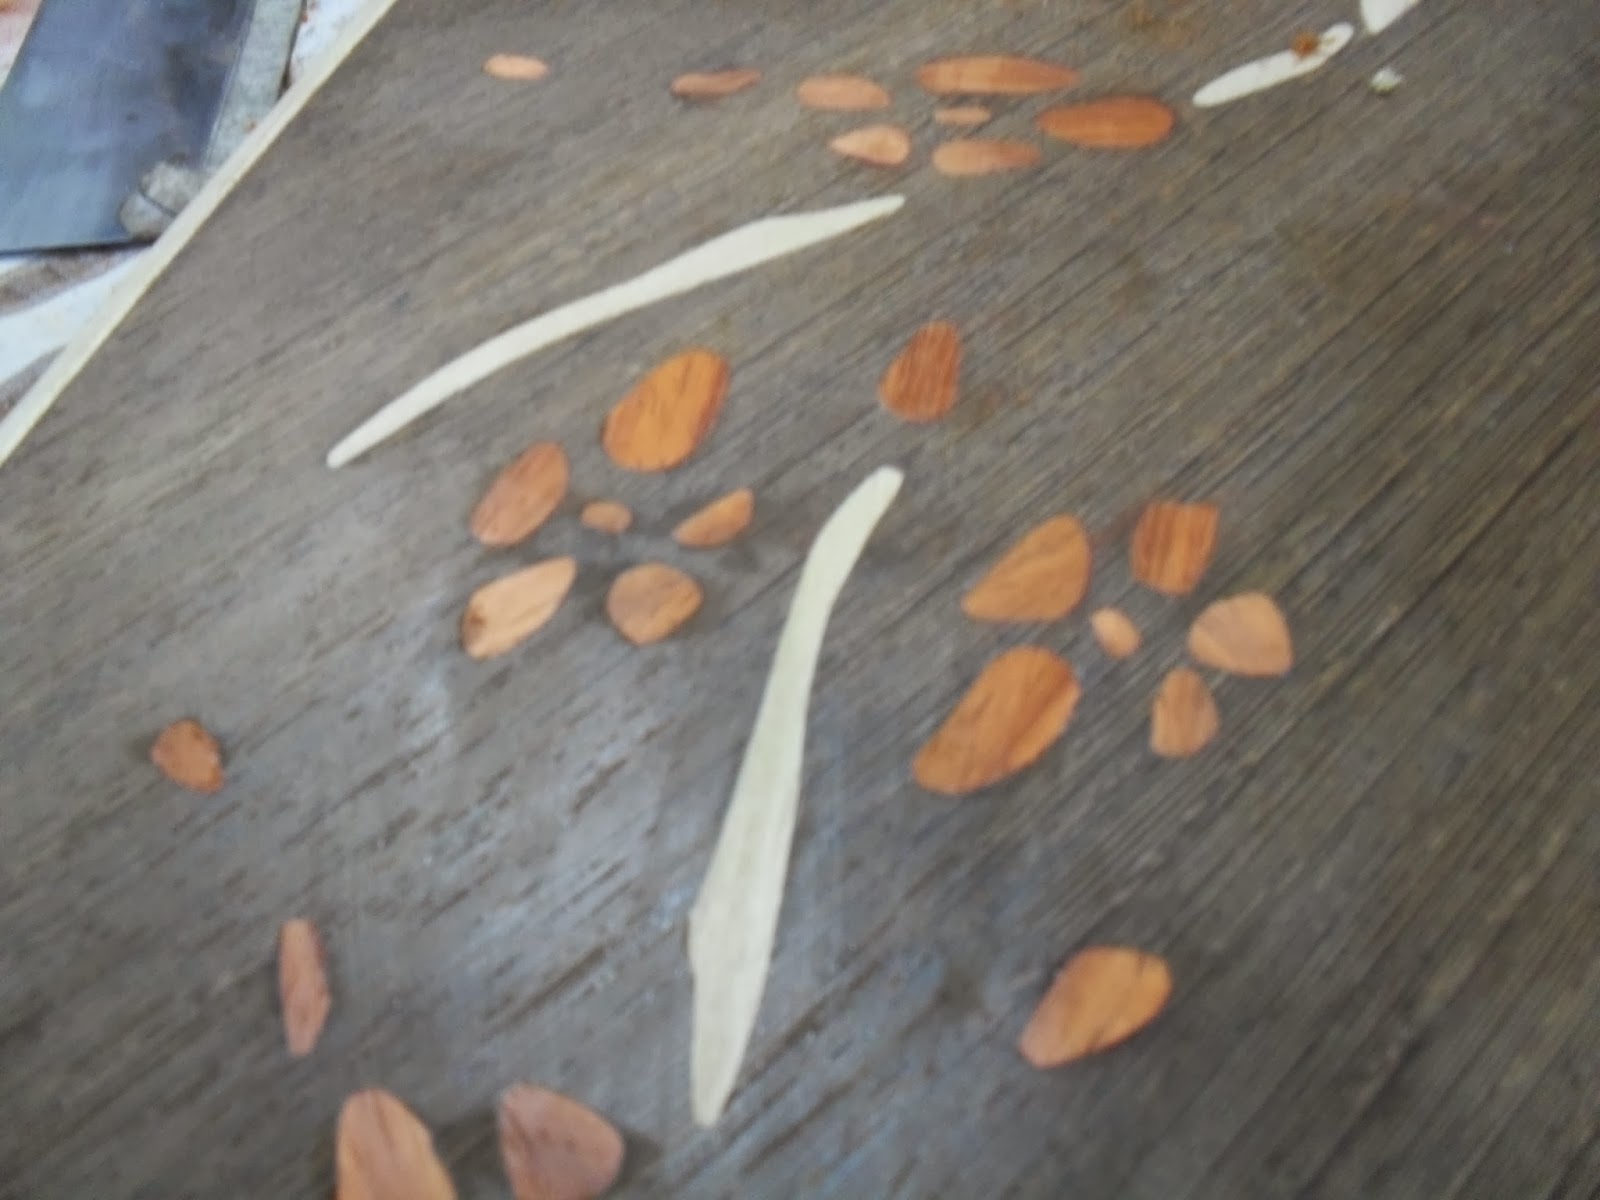
Marking out some ideas as to how I want the inlay patterns to look like. I printed off some images of cherry blossom images both ink drawings and stencil drawings.
The thing with router based inlay you don't want it to be too difficult.


Marking out how I sort of want the inlay patterns to run into the other panels.

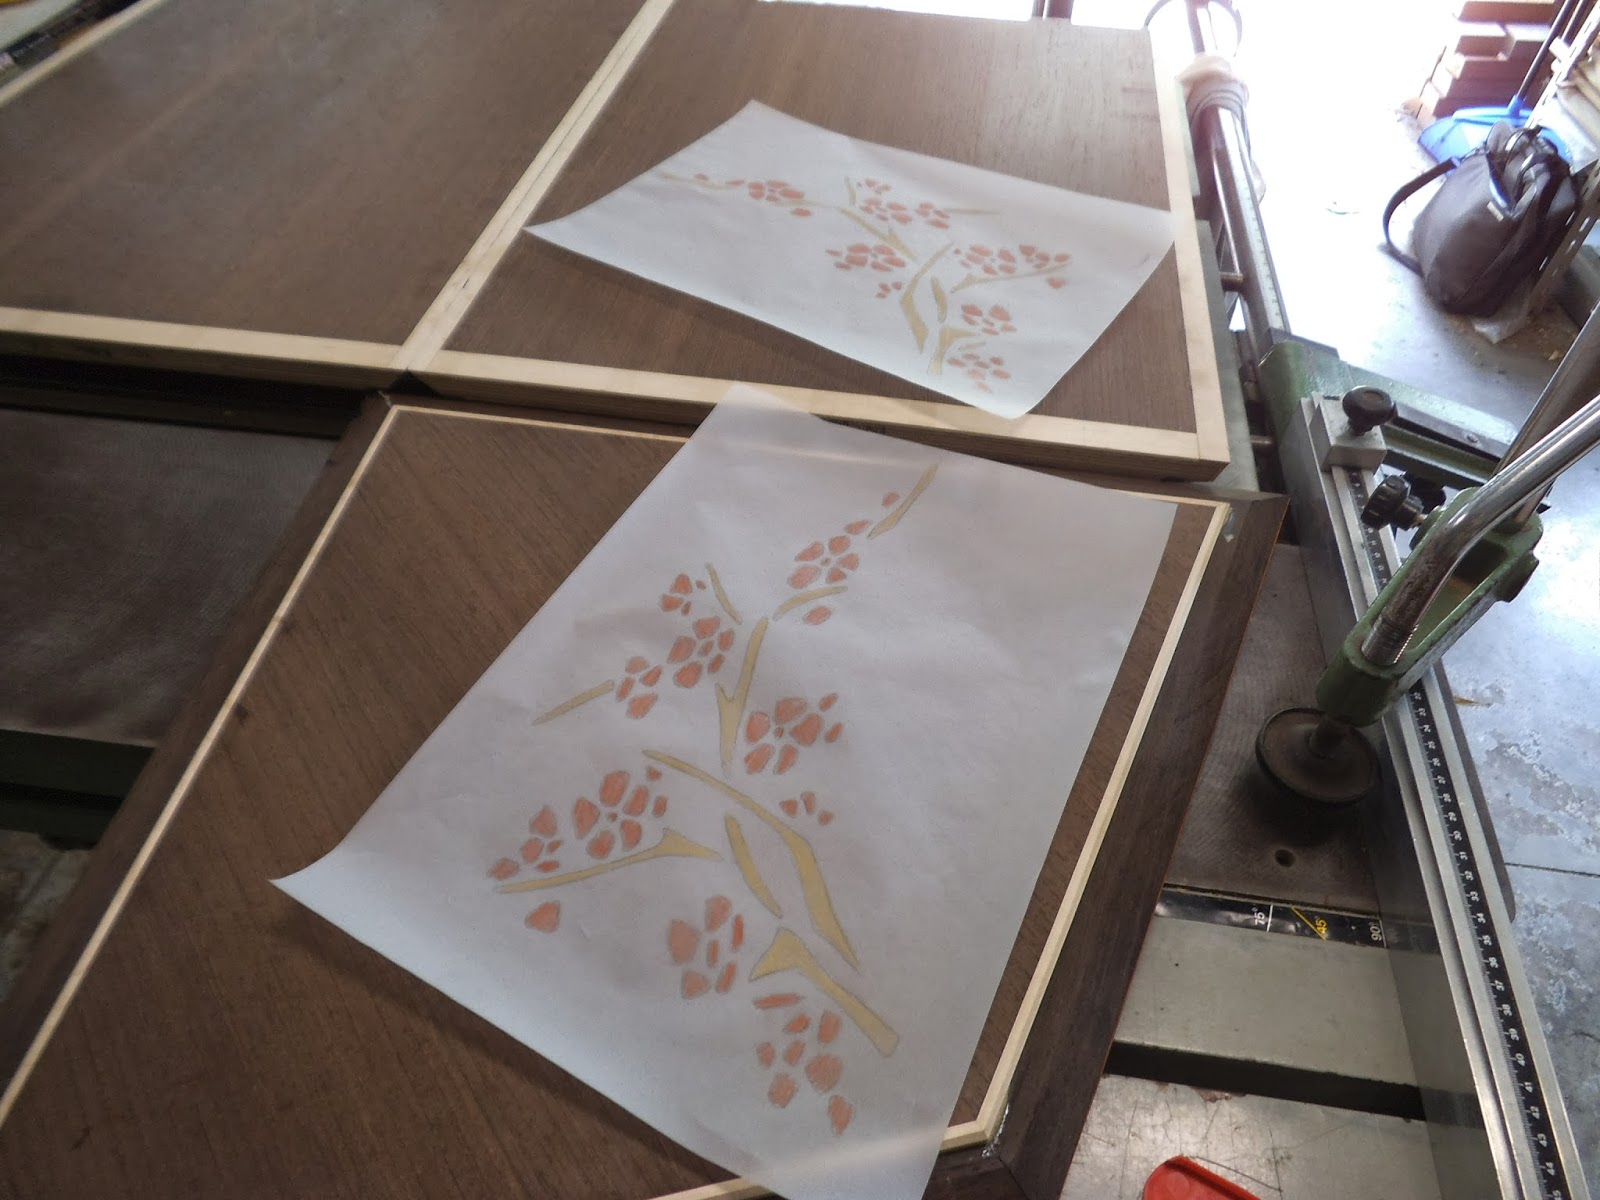
Playing with some other designs. Decided to play with some patterns. Thought it would be best to repeat some of the shapes by rotating them. This would make things still look quite interesting but I could still use the same templates.

The other side would be the same design but just mirrored.


Still not totally convinced with both designs, totally not the top one too chunky and too much going on. As for the branches in the other one I do like but will neaten them up a bit. Still not totally convinced with the flowers though. The thing with router based inlay you don't want to make the shapes too complex as they will be too hard to cut out the housings and also too hard to cut out the shapes.
I do like the flower design but I don't think it works with the type of branch design I'm using. It has too much geometric shapes where the other shapes with the branches is very organic.

I decided on changing the branch idea and making it less chunky and not repeating the pattern so much. As for the flowers I decided on keeping them the same design for now just wanted to see what they would look like with the new branch designs.


I wanted the design of the sakura inlay images to spread over both of the front door flaps but not taking up the whole entire section. You still want to leave some negative space. Putting images every where would make things too complicated and would loose the viewer.


As for the top section ( back doors) I wanted it to be the same pattern but flipped. Each image on the left and right doors is the same just mirrored.


I want all the inlay to sort of blend in to one another when moving to another section of the cabinet. The top section of the cabinet would have the same inlay image but moving towards the right where it would connect up to the same image again but on the side.


I had though about adding two of the images to the top but just mirrored to one another but found this to look quite messy. I'm more happy with the singular one where it seems to offset towards te right creating a non symmetrical layout.


As for the back doors they seemed quite bare more so down towards the bottom of the doors. I would like to add something here but for the sake of adding something. You would only see this bottom section of the back doors when the front door flaps are folded down.


I wanted to create sort of a center vocal point to the back with the inlay on the sides. I figured this should be important to think about since the pieces is a central room piece 360 deg.

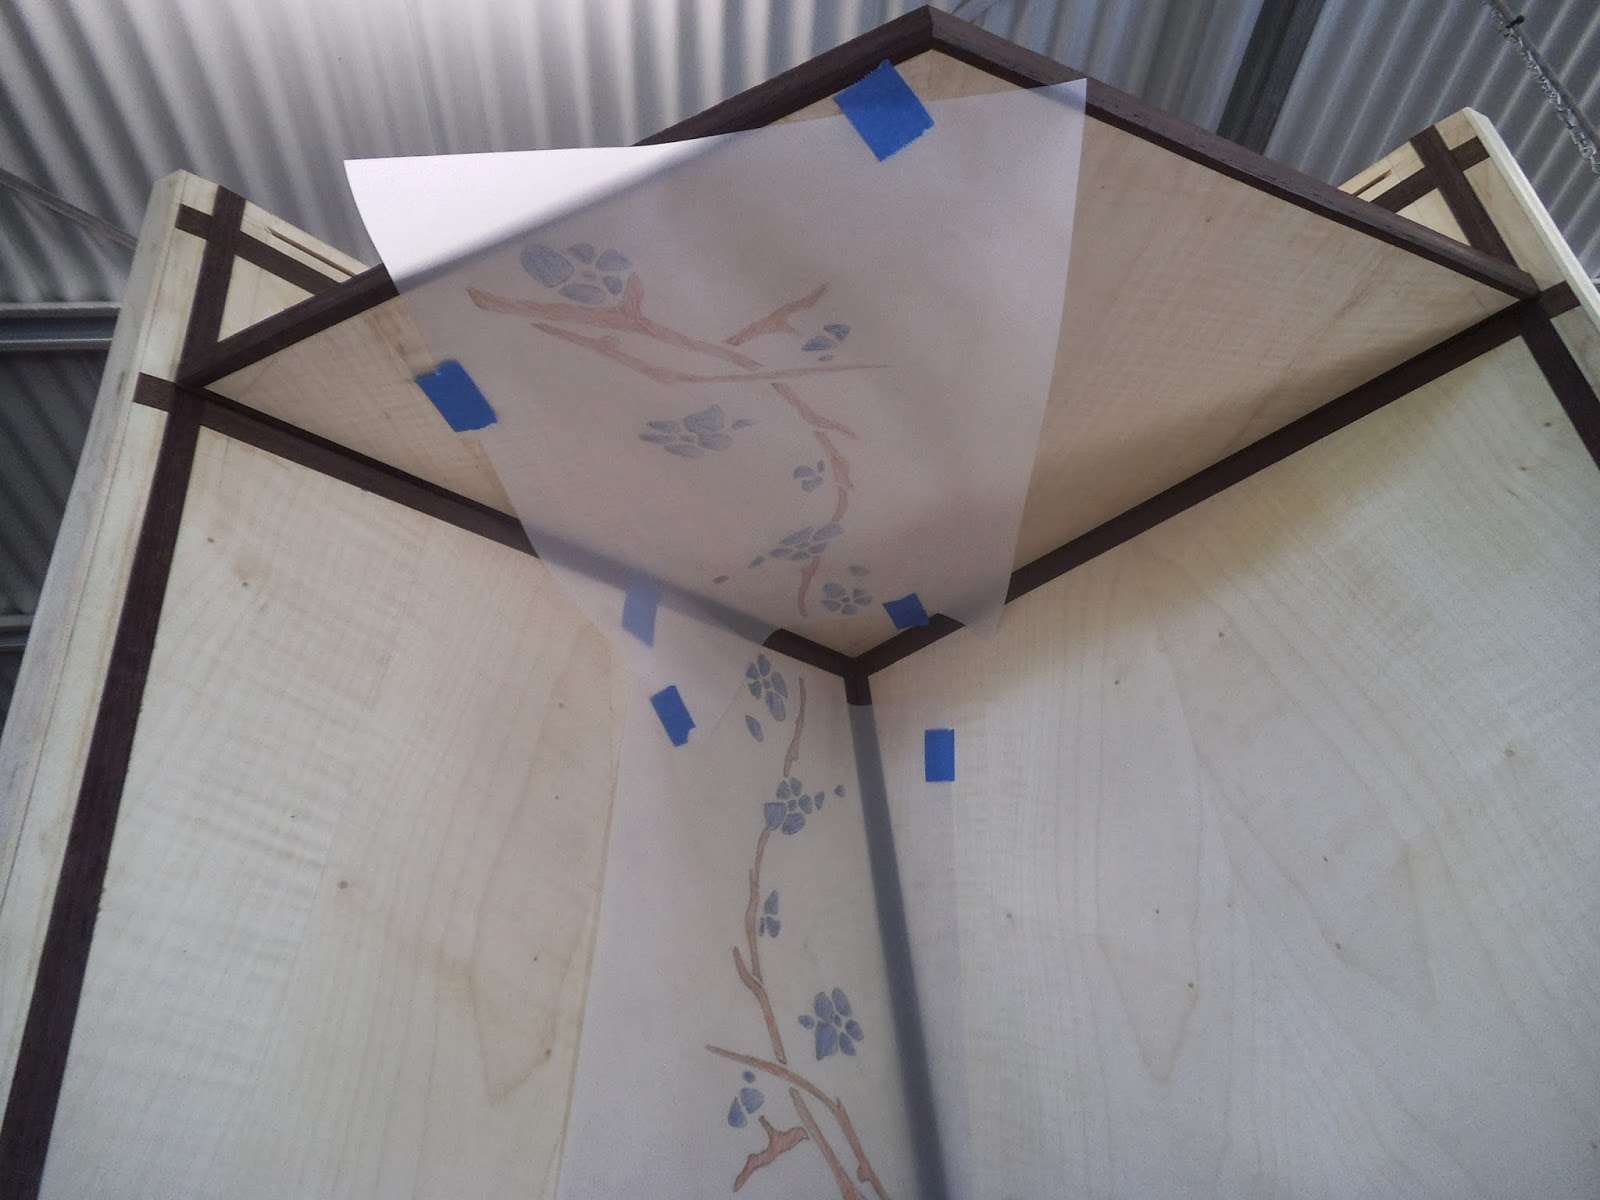
This is sort of how I wanted the inlay for the top to connect in with the sides. Most of the sides would be bare as I don't want to add really any more as it would make it look too busy and over crowded loosing the viewers attention as there is too much going on.

If I was to add anything more to the back it would be small amounts of floating cherry blossom petals.

Coming up with inlay ideas for the inside section of the cabinet. Again this was really only added to cover up the mistake of the blue tape on one of the sides, the plan was to have no inlay inside. But since I'm going to have to add inlay I decided on making a feature out of it.
I don't want to add too much as it would take away too much of the grain feature from the 'V' book matching. Plus also it would make the inside seem to busy.

After some though I have decided to do some more brain storming for the inside inlay. This shape is just not doing it for me. It really just seems like it was plopped there and seems very out of place.
I tried doing different sizes giving some kind of hierarchy of vocal points and also added small sections of branches but still did not really help.

With some more thought I have decided on changing the outside inlay images again. The last previous choice just seemed out of place mainly with the type of design for the cherry blossom flowers.
I'm more happier with this choice although the smaller cherry blossom petals may be too hard to cut out. They would still form some difficulty in routering out the housings but more so in cutting them on the scroll saw, more just handling them.
I would like to play further with the layout of the images in what kind of placing I want to have them in. I sought of want them to revolve sort of around the diamond negative opening.


I actually like this one the most still brings the further towards the diamond opening as well directing the viewer to the sides ( due to the flowing direction of the cherry blossoms) This is important to think about since it is a 360 deg piece.

This is what I'm thinking for the back doors. Still creates enough balanced negative space but has that interesting flow from the top to the bottom of the door.

This arrangement not so happy with as it creates too much negative space towards the sides of the doors. It seems too linear to me compared to the other one which seemed more organic and flowing.

Since deciding on the image I wanted this meant that I had to make a stencil of it which than I could transfer the image to the life scale inlay drawing layout.

Stencil ready to be cut out.

Stencil now cut out and now ready to transfer the images to the life scale drawing layouts.

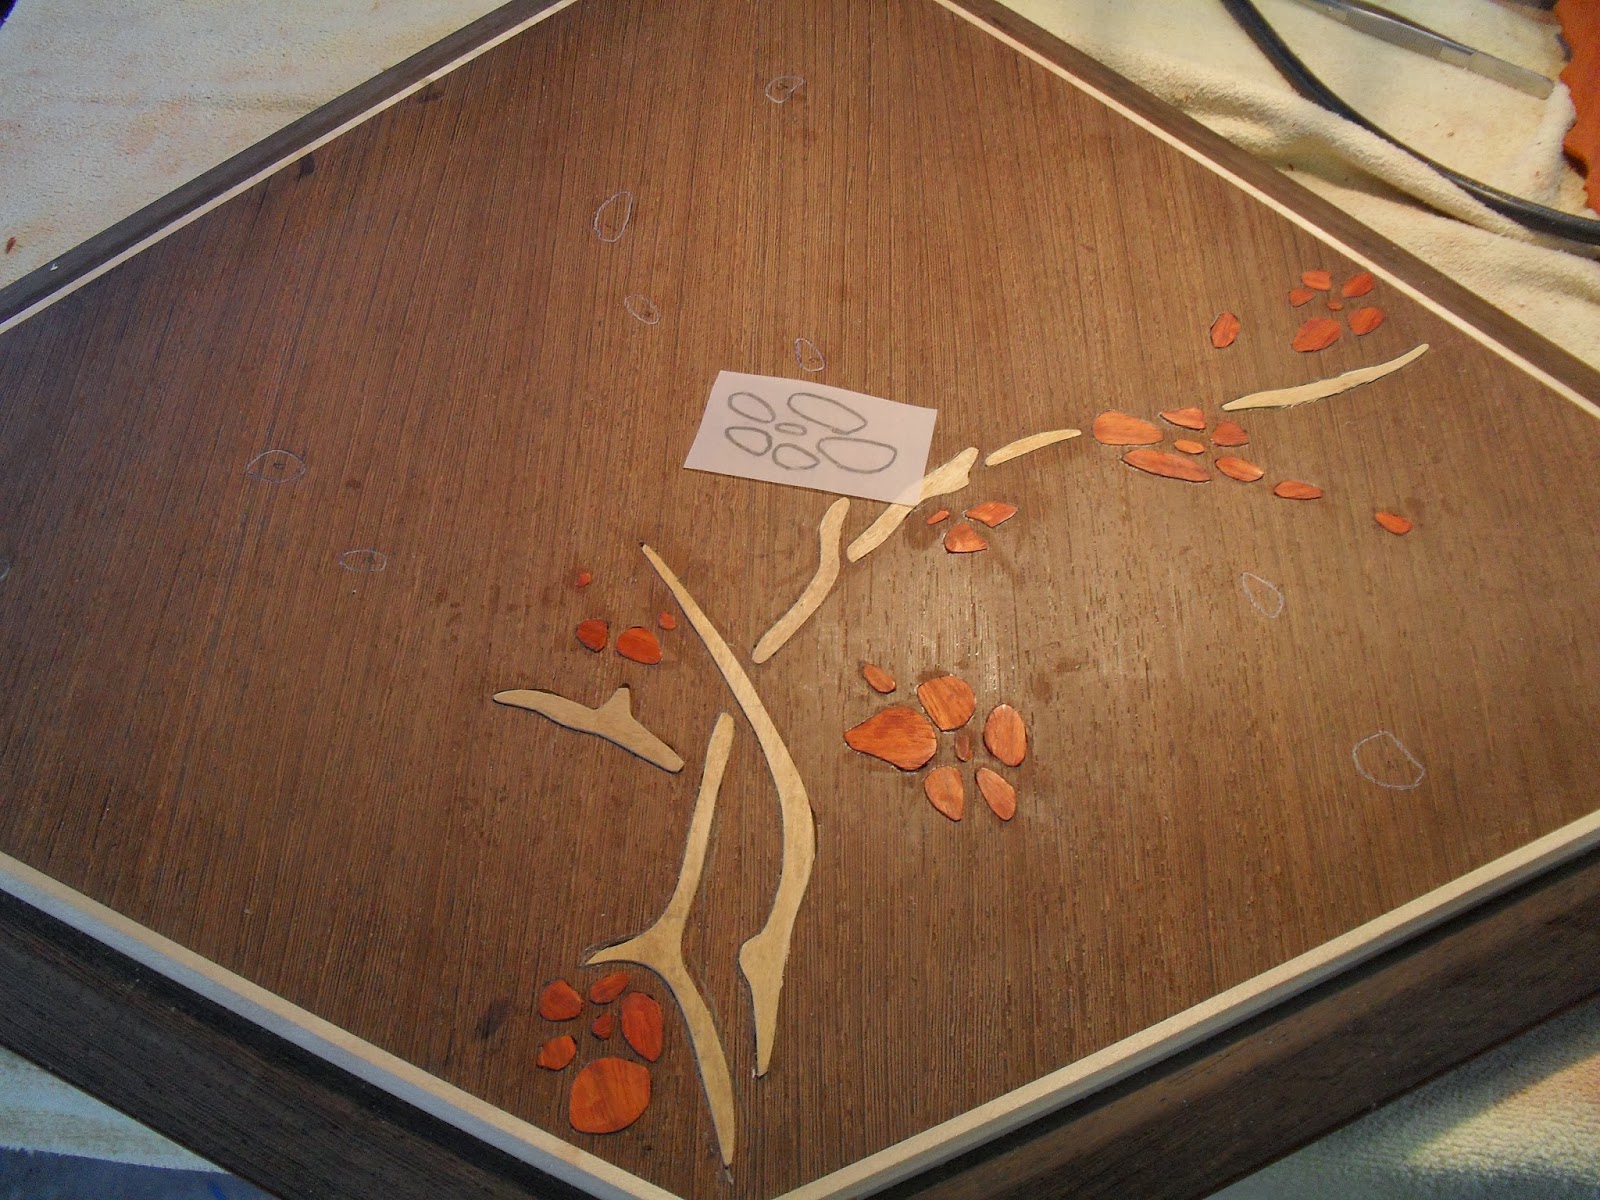
I still layed out the images of the inlay on the doors to get a reference as to where I was putting the stencil onto the life scale drawing layout.

Transferring the stencil image to the right side door. I wont be drawing out both doors as that is not necessary since the other one will be the same design and placement just mirrored.

Image drawn down. When it comes to assessment I will go over everything with a fine liner.


Old pattern next to new pattern. The old pattern is the one on the left which is a lot smaller compared to the right one where that is increased in size.


New design but just enlarged

This was the same design but things just made bigger. Also some extra things added although these seems way too much I may change it but will seem later down the track.

Cutting out the new stencil design.

New stencil design cut out.

Transferring stencil design onto parts.

Here I am transferring the stencil design onto the front door top flap and back door, the over lapping section.


Design for sides and how they would be connecting.
Design for top and how it would flow in connection with the right side.


Transfering the stencil image to the top of right side and bottom of left side.


Seeing what the inlay images would look like on the drawer box bases. If time allows me I would like to add inlay also to the drawer box bottoms.

Transferring the stencil image to the drawer box bases.


Transferring some of the inlay shape to the long side of the drawer box. I dont want inlay on everything just a small amount.

Started to play around with the inlay arrangement for the inside sections. I'm quite happy with this design compared to the last few designs I came up with.

I had though about doing a mirrored section (left in right ) for the middle point where the sides meet up but now this doesn't look right and seems too busy also really doesn't go with the main shape of the cabinet.

I decided that it looked a lot better where the design is just only placed on one side. I needed on the left side any way to cover up the blue tape sections.

This is what I meant where it doesn't really go with the shape of the cabinet it seems out of place.

Had though about continuing the pattern down on the base like this but the inlay would be covering up too much of the V booking matching on the ikebana base and top drawer base.
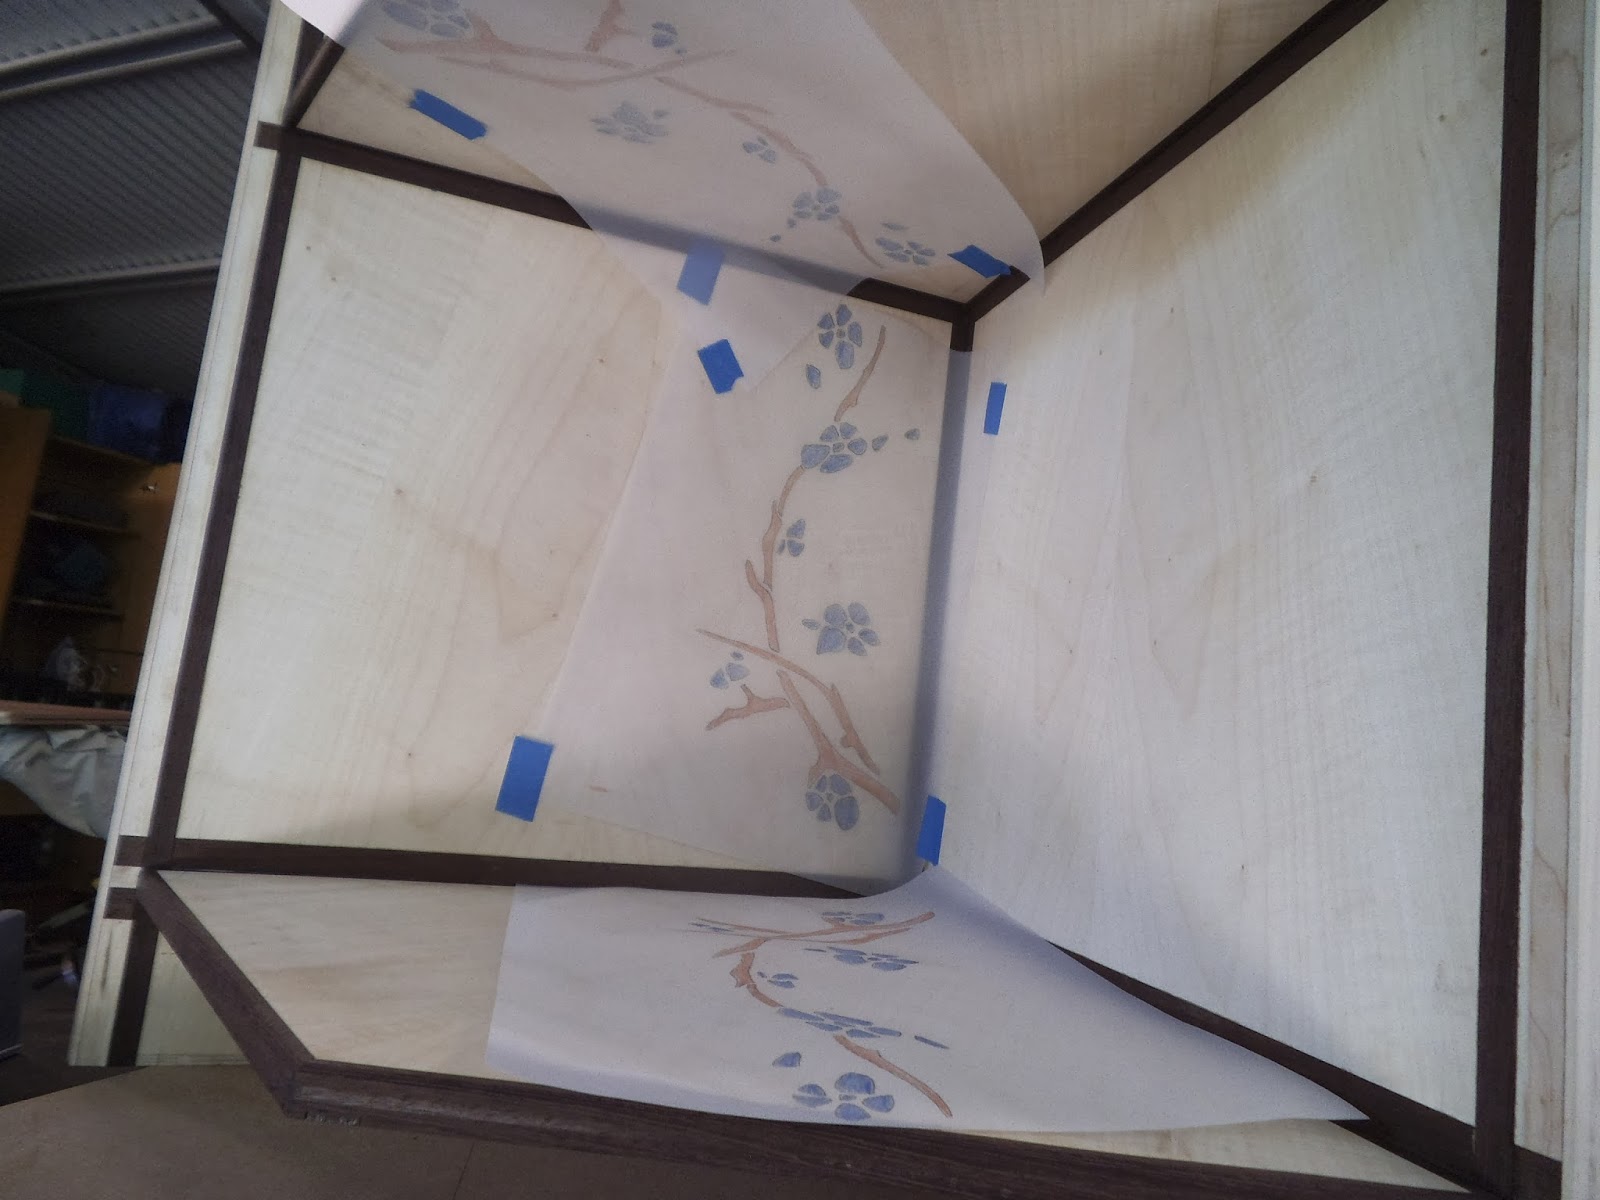
Image of all the inlay. This seems too much so might come up with some other ideas how to tone it down a bit.

I'm liking this one better where a small amount is added to the corner of the ikebana base and also top drawer base. I like how its only focusing on a specific section of the inlay image. I find it offsetting it to the corner here gives off a balanced feel and also doesn't get in the way of the V book matching.


Offset inlay image for the corner section for the top drawer base panel.

view of the whole inlay section.

I had though about continuing the inlay pattern by running it into the back right door at the bottom but it seems out of place.

I found it looked better by running it into the bottom door flap when it is opened.


I had thought about running the inlay pattern into the top of the back left door as well. This would meant that the inlay image would run across the whole cabinet.

I'm really liking this image and I think it would be best to use if for the outside as well even though I have already done the image transfer to the life scale drawings. I think it would be best to change it since the other design seems too much over the top and too crowed. This new design seems more pleasing to the eye and not so busy. Plus I reckon the last design would be to hectic to do all the routering and cutting out the inlay pieces.
This would mean that I would have to redraw everything

Cutting out the new stencil for the inside sections and out side.

Transferring the inlay images to the inside sections of the cabinet on the life scale drawings.

Colouring in the new inlay pattern designs.

This is the final decided image for the router based inlay for the doors, top and sides. I decided to change it as I think the last one was too busy and it would have been a nightmare to do all the router based inlay cutting for it.
I coloured in the images just to get a rough idea what it would look like even though these are not the specific colours I would be using.

I boxed the whole image with a red boarder line this would make things easier when making sure I have enough carbon transfer paper to capture the whole image when doing the transfer.

Taping pieces of the carbon transfer paper together so its able to transfer the whole image in one go to the panels.

Transferring the top inlay images to the top.

Just checking to see how the transferring is going.

This is what the image looks life when the carbon transfer paper puts an print onto the panel. The good thing about this stuff is that it doesn't smudge, although its just annoying to remove the unnecessary lines and the routering is all done unlike graphite paper.
I tried rubbing it off but that doesnt work the only way of getting rid of it is by sanding it off.

Just finished transferring the inlay image to the top. I was using a yellow chalk pencil but it was smudging too much and wasn't working too well. I found using a white pencil worked better. Its quite difficult to draw onto wenge due to the multiple cavity sections.
The top too does seem a bit blank as well I might see what it looks like when all the inlay pieces are glued in. I don't want to add heaps of extra stuff might just add a few floating petals.

Transferring the front door flap inlay pictures from the tracing paper to the real doors. To avoid movement the carbon paper had to be taped down and the tracing paper as well. This would make sure that the whole transfer of the image would be in the exact place I want it.

Close up of front door flaps. I don't want too much images as it will make the piece seem too over crowded. I will access this later on when all the routering is done and the inlay pieces are glued in. I might a few more floating petals.

Images transfered to the front door flaps and gone over with white pencil to make them more visible.

Transferring the inlay images from the tracing paper layout onto the panels for the back doors. Since there was going to be a left and right I just had to flip over the tracing paper layout and rearrange the carbon paper

Image transfer onto back doors went over with white pencil to make it more noticeable.

Not the best pic but shows the image transfer of the inlay images on the back door and front doors. I had to use a white pencil to go over the carbon transfer paper lines. I was using dark blue which was the only colour I could find at the time. Normally you would use white or yellow preferably a light colour when going onto a dark surface.

Transferring the top inlay image to the left outside side section.

Transferring the bottom inlay image to the right outside side section.

Transferring the final image onto the left inside side panel.

Transferring the inlay image onto the ikebana panel from the tracing paper using the carbon transfer paper. Normally I would use graphite transfer paper since its easier to clean up due to not being as oily as the cabon paper but I did not have any on me at the time.
I was able to get the carbon paper at office works.

Transferring the inlay image to the drawer box base panel with the carbon paper for the right section.

Drawer box bases ready to be routered now.

Transferring the inlay images to the drawer box lids inside section. The outside section does not have any inlay on it.


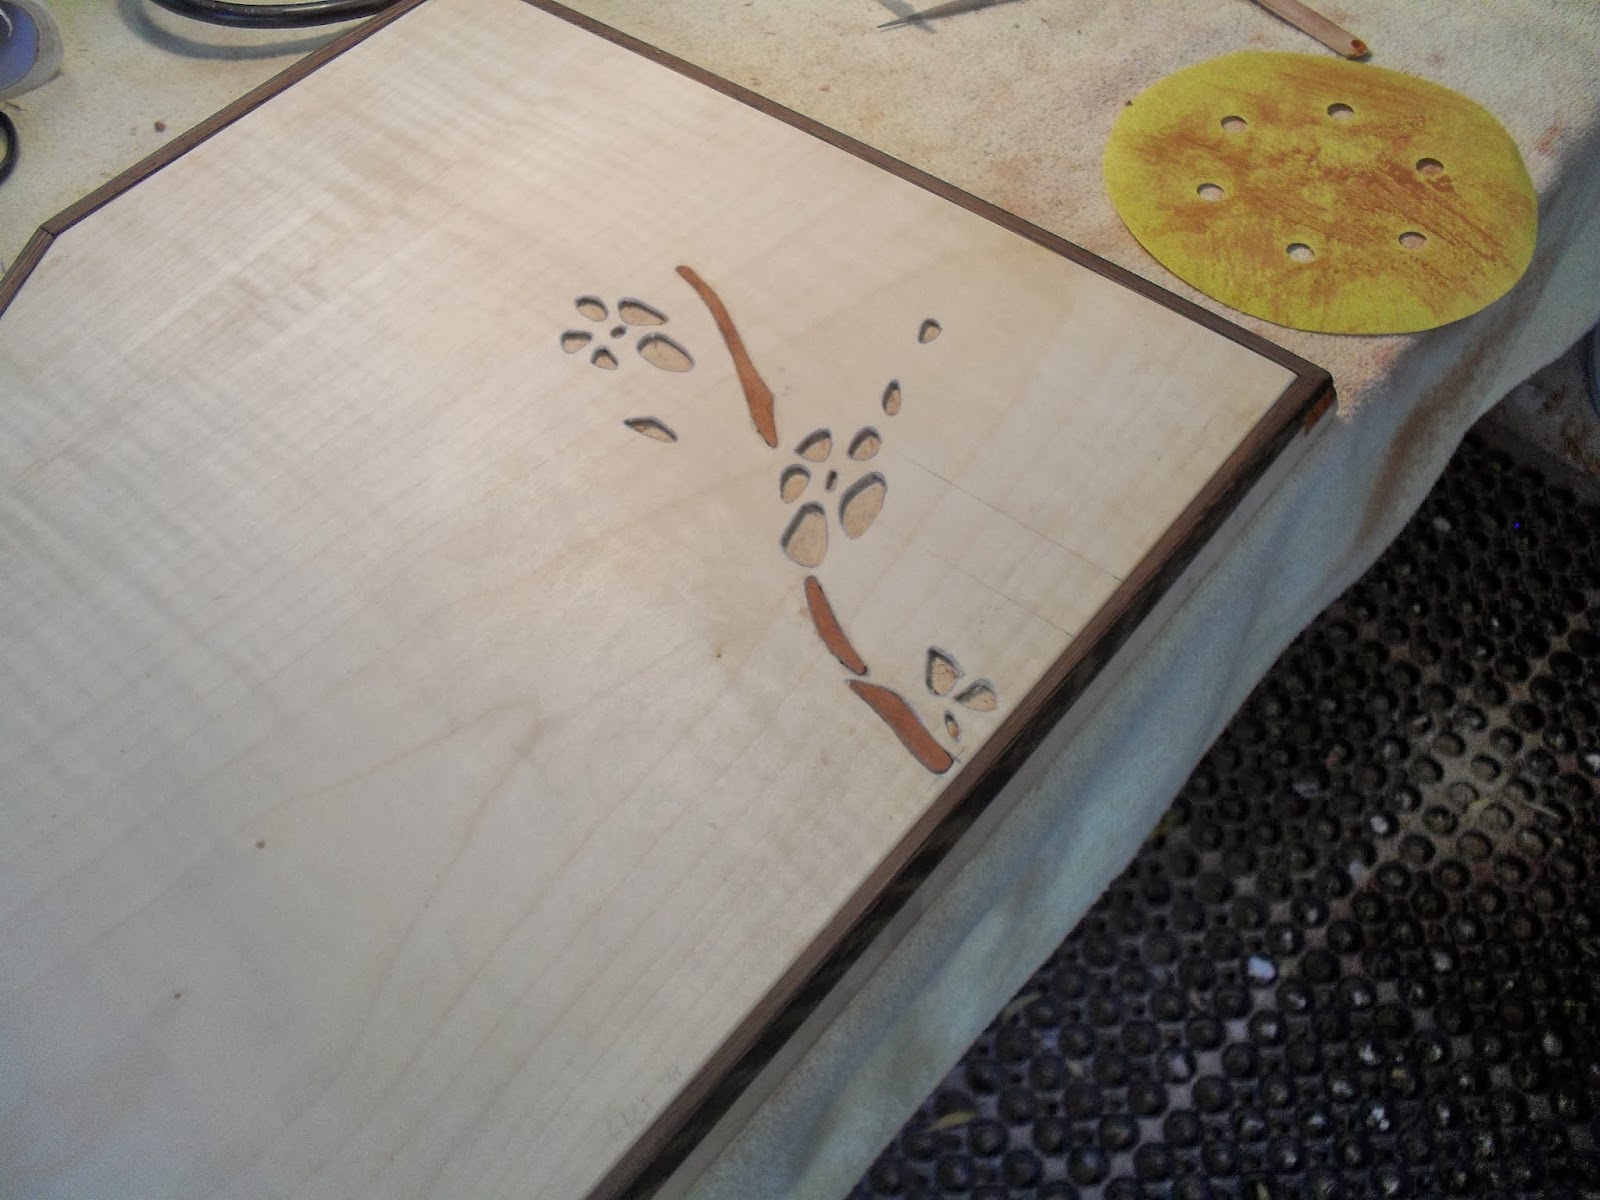
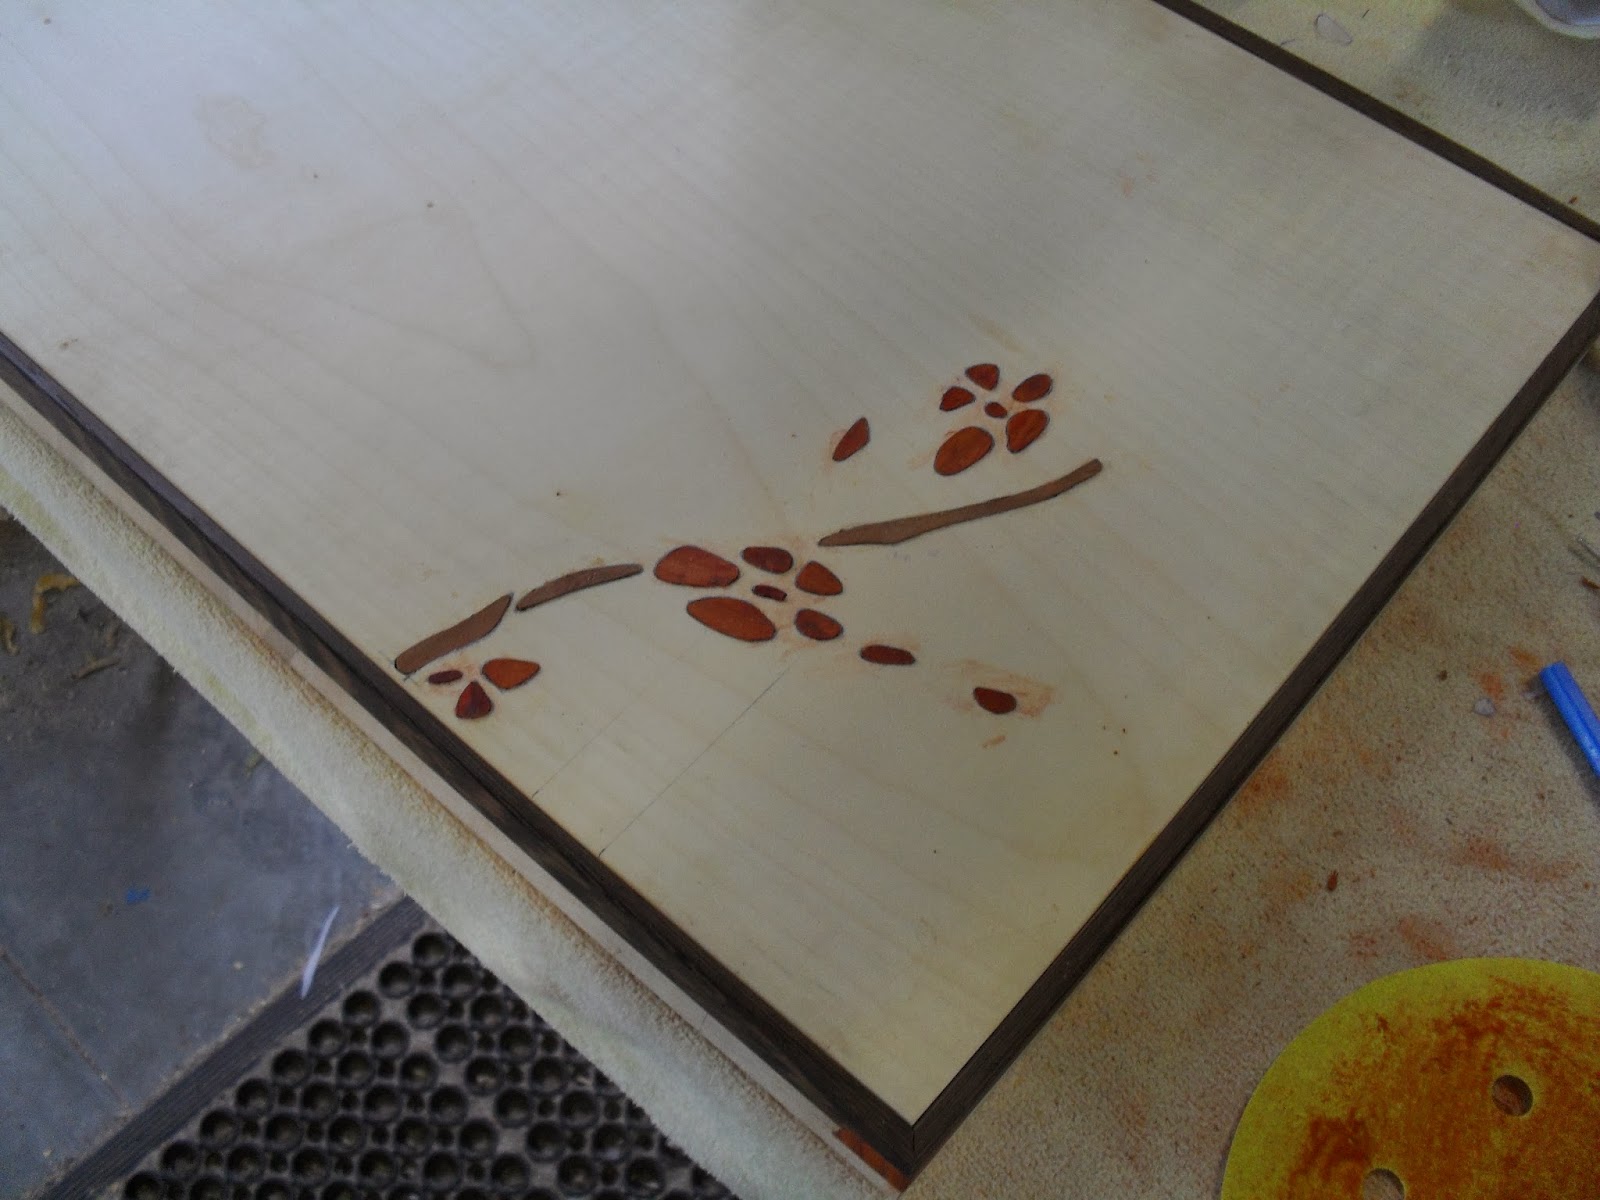
I'm still debating whether to do inlay on this or not. The inlay was merely just added to take your eyes away from a mistake. The maple veneer is very transparent and shows up some of the dark sections from the plywood I did not have any idea this was going to happen, Will be remembering this for next time.

Transferring the inaly images to the inside section of the right bottom door flap.

Image transfered and ready to be routered out.
Transferring the inlay image to the in side back door left hand side one.

I wanted to do a inlay test on some scrap plywood that I had glued some wenge veneer. I wanted to do some tests to see if things were going to work out. After watching some videos on inlay work it was best to score the outside lining to prevent grain break out.
I found with wenge especially quarter cut wenge veneer this is not really needed. I found you get a good cut if your using very sharp cutters so scoring the edges with a blade to create a grain break cavity is not really needed here. Although this may be totally different for the maple as each material is different.

First I had to make a 2mm trim around the out lining of the shapes on the waste side of the line. This will ensure you get close or the exact shape you want. Works great for small areas. Plus doing this will prevent the chance or huge grain break out when using a larger cutter to remove the waste.
Once the 2mm trim was done the waste was removed with a 4mm straight cutter router bit.

Depending on the complexity of the inlay job its best to number the inlay housings and shape transfer shapes. Also naming what timber that goes into the housings helps. Generally as well you also note what parts are going to be fore ground, middle ground and back ground but for this type of inlay i did not want this. This is generally for more complex inlay jobs where tone is added to create shaping from the hot sand technique making the images look more 3D.
For me with this inlay job I was wanting to achieve that ink sketch look inspired from the sakura ink paintings basic shapes with not too many colours or shading.

Just finished routering the test inlay piece.

Finished off the test piece. I was quite happy with it since it was my first time doing router based inlay, I tryed to get it done pretty quick. Not so happy wit the branch section needs to be thiner. But I was really happy with the out come of the petals. All the parts were cut out on the scroll saw.
When cutting such small pieces on the scroll saw you need to try and keep the parts in the main piece ( veneer slab) as long as possible cut away most of the shape than the last bit you can carefully cut it on the scroll saw or do it by hand.
I'm actually thinking it might be best to invest in some spiral cutters for the scroll saw this means I can go in any direction. Also I will get a better cut.

Decided to change some of the shapes for the inlay images all over. When doing the test it was based off a small section of inlay from the main image. I found that this section seemed too think and did not look right. So I decided to thin some sections down.

Doing the 2mm trim to the shapes for the top.

I have been pulling in late hours with this project. The lightening is not very good in my work shop and when doing this kind of routering you really need good light. The light direction really needs to be behind you facing into the direction of the router so you can see what lines your cutting.
I decided to use two lamps one general one that just provides light over all and one where I can move around depending in what direction I'm using the router.
To avoid things moving around I clamped the pieces to the work bench.


Routering the 2mm trim for in the inlay parts for the top and bottom front door flaps.


Doing the 2mm trim for the back doors.

I decided to take out the 2mm router bit after I had finished routering for the day since there was a lot of gunk build up on it. Soaking it over night in this cleaning agent should break down any sap, wax or glue that is built up on the bit.

Spent time cleaning the 2mm straight cutter router bit after having it soaked in some orange spray and wipe cleaning agent. ( same stuff I used for the saw blades and other router bits in another post.)
I had to scrub the junk off the blade with the kitchen scourer sponge. You would be surprised that most router bits of saw blades or even drill bits are not blunt its just they are not cutting well due to gunk build up one it this is usually caused from glues, oils and waxes from the timber/ timber products.
Once I cleaned the router bit and placed it back into the trim router and began routering it was like it was bran new.
I have 4 placed on order as well. I have done this since I have heaps of routering to still do. I wasn't sure whether since the router being so small could they sharpen it, meaning it would only get one life. But the main reason why I order more was because if I need to send some out to get sharpened I can still keep working.
Also the fact that its close to Christmas and most places are going to be shut including tool sharpening places.

Finished doing the 2mm router trim around the inlay shapes for the back doors. Now I have to remove the waste in the middle of the shapes which I'll be using the 3-4mm cutter.
Some of the mirrored inlay doesnt look 100 percent spot on to one another but I'm not too bothered by this since its meant to have that ink/ sketch look also everything is organic and is meant to be different ( to some degree)
If I was wanting everything to be spot on I would have done the programing and used a CNC.

Doors looking quite good I placed the back doors with the front door flaps to see what they were going to look like.

Started to do the inlay routering for the sides of the cabinet.


Finished routering the 2mm trim for both of the out side side sections. Depending on what it looks like later on when the inlay is glued in I might add some random floating petals just to give that extra touch.


Just started doing the 2mm trim for the drawer box bases, inside sections.

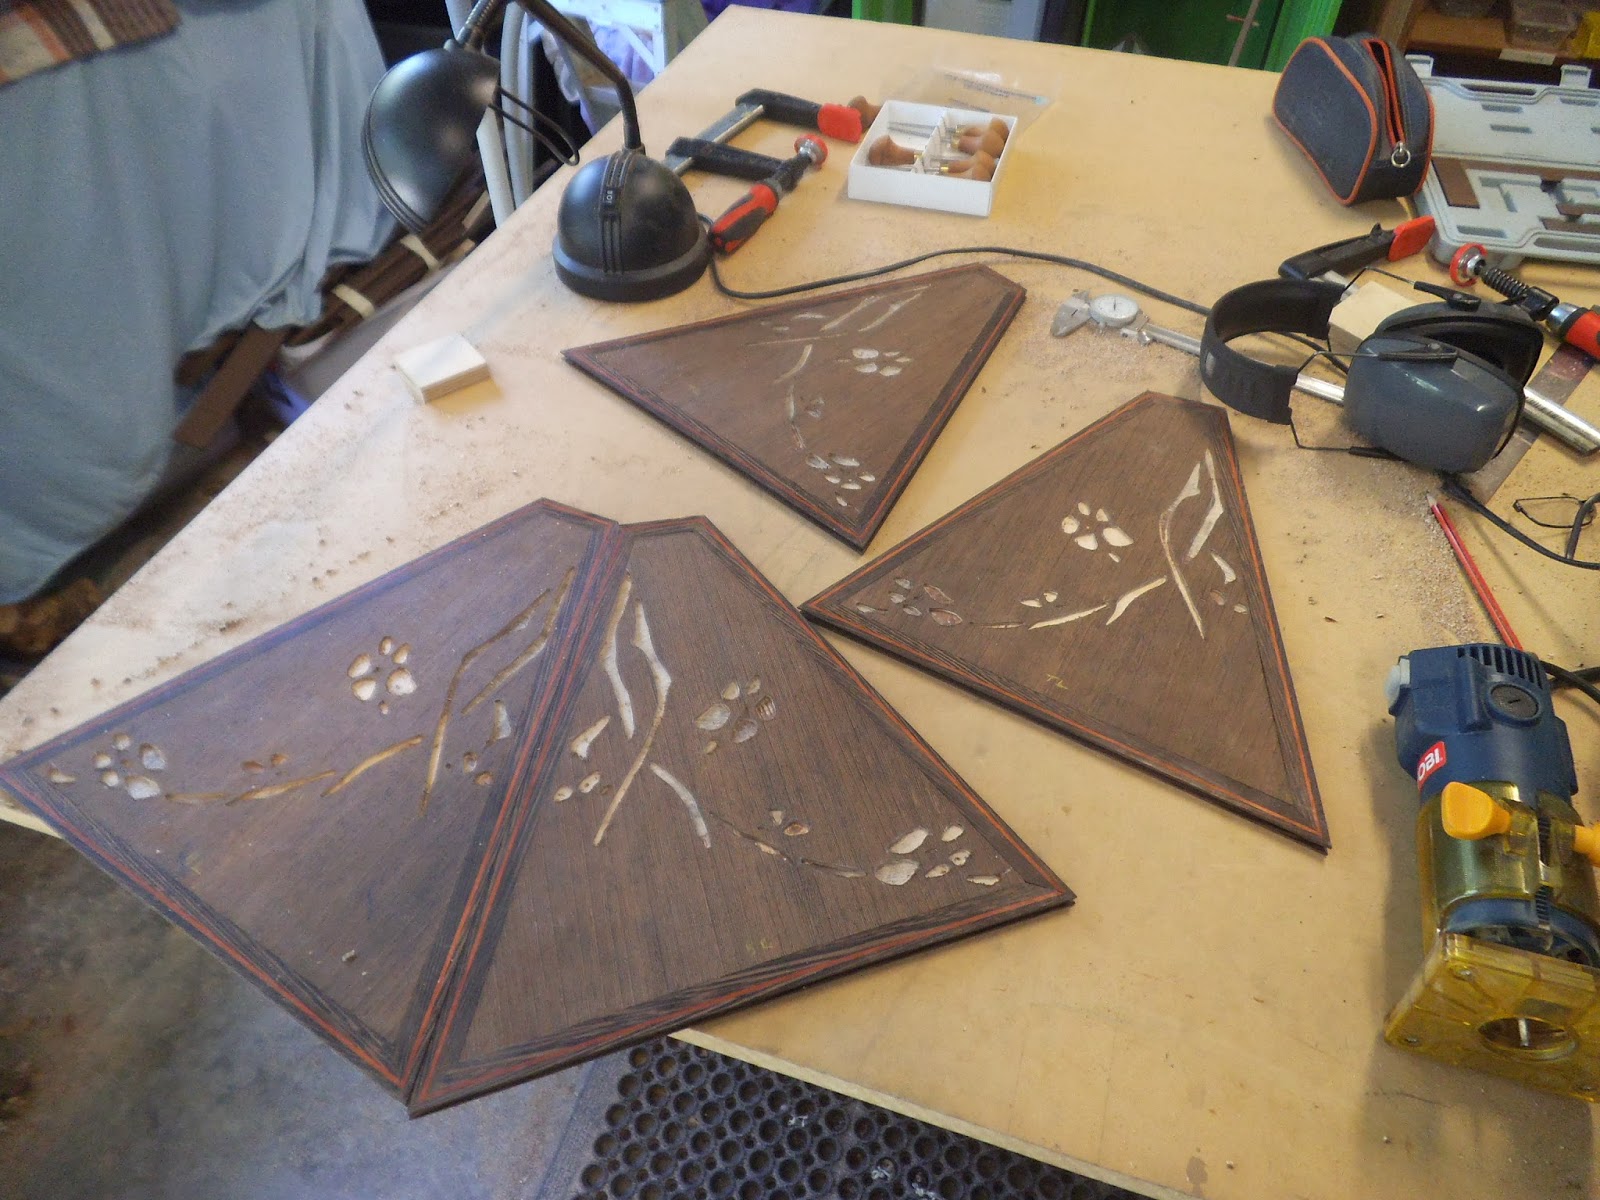
Finished removing the waste sections from the top and now is ready to have the inlay pieces cut out and glued into it.

Finished removing waste sections from the bottom front door flaps.

Waste sections removed from front top door flap.

Waste sections removed from back door sections.

Waste sections removed from drawer box bases inside sections.

Waste sections removed from sides outside sections.
I went around everything again to neaten up the inlay housings before cutting and gluing in the pieces.

I did a router test on the maple to see whether it was going to cut well with out splitting out. I did not split out but the router bit is way too blunt and I have done about 3 cleans. This router bit will have to be sent off to get sharpened. Will need to wait till new cutters come in before routering out the inlay housings on the maple faces.

Removing the waste sections from the inlay housings using a 4mm straight cutter router bit. Once I had removed all the waste I than went back around the shapes with the 2mm straight cutter again just to neaten up the housings.
This section is the back left door.

Sanding down one of the slabbed paduke pieces to 2.5mm. The inlay housings are 2mm in depth. I only want about .5mm sticking out making things easier to clean later down the track.

Started to glue in the paduke pieces to the top of the cabinet.

You physically can not rush this. To get each shape I transfer the housing shape to some tracing paper. I than cut out the shape from the tracing paper than transfer it to the paduke.
I try to pick that best grain orientation which will make it look like a petal/ leaf a bit. Once that is done I carefully cut out the waste from the shape on the scroll saw.
After this I sand the piece to get rid of the rough edges but also to finish it to size. Some times I may just router more out of the housings to get a quicker fit. Once I reckon its a nice tight fit I place some glue in the housing than tape in with a block and hammer.
If there are any gaps I fill it with paduke dust and super glue.

Almost finished the petals for the top. I have decided to do all the petals in one go than when that is done work on the stems.

Starting the inlay petals for the left side. This is the bottom section of the left side panel.

Almost finished installing the petals. Even though it doesn't seem much work it actually takes a lot longer than you think.


Progress shots of the sakura petal inlay for the front bottom door flaps.

Sakura petal inlay pieces done for the bottom front door flaps.

Trim router blew at first I though it might be the brushes but they still have heaps of life in them. I may check the starter button electronics if I can't get this up and running will have to purchase a new trim router.

Staring to cut and glue in the sakura petal inlay pieces for the back doors.

Having to use large router since trim router blew.


Progress shots of cutting and gluing in the sakura inlay petals for the back doors.

Unfortunately the trim router I was using blew and I had to use the larger router I had for a short period. This really is like trying to knock a brad in with a sledge hammer. The router is way too heavy and large to do fine work especially with a 2mm straight cutter. I am thinking of investing in a dewalt trim router if I cant get my other trim router up and running.
The dewalt trim router I have been looking at is quite good it has a speed change and is a lot more accurate in depth set up also has a dust port. This type of trim router may be a lot better for doing the inlay housings for the maple sections.


Back doors done for the sakura petal inlay.
Inlay petals glued in now for the top front door flap sections.

Progress shot of inlay petals being glued in for the top front door flap.

Sakura petal inlay glued into one of the top front door flaps now to do the other one.

I had to sand another paduke laminate down to 2.5mm through the drum sander since I had used up the other one. This was slabbed up on the band saw at tafe.

Sakura petal inlay finished for the top front door flaps.

Sakura inlay petals all cut and glued in for the doors. I am thinking of adding small inlay petals in the negative sections of the wenge but only a little bit to give that windy floating effect. I will access this later down the track when all the inlay is done.

What doors would look like then the top front door flaps are folded down.

Starting to cut and glue in the paduke inlay for the sakura petals for the drawer box petals.


Sakura petal pieces all glued in.


2mm router trim made around shapes for drawer box lids.

Bottom drawer box lid.

Top drawer box lid.


Waste sections removed from inlay housings for drawer box lids.


Close up shot of one of the drawer box lids with the sakura petal inlay pieces glue in. I wanted the design to span over the two lids.

Sakura petal pieces glue in to th drawer box lids.


2mm router trim for the ikebana base and top drawer base.

2mm trim for back left door.

2mm trim for right bottom door flap.

Routering the 2mm trim for the inlay pattern on the left inside panel face.

Removing waste sections from inlay housings for left side.

Removing waste sections from inlay housings for left back door.

Removing waste sections from inlay housings for bottom right door flap.

Removing the waste sections from the inlay housings for the Ikebana base panel and top drawer base panel.
There is still a bit of experimenting I need to do before gluing in the blue petals. I'm not too sure whether its going to be better to try and soak the parts and glue them in and plane them down, hopefully still being blue when making inlay piece flush with panel face, or gluing them when they are plane American beech than paint after wards when made flush.

Starting to cut out and glue in the American beech inlay stems into the top. These are a lot hard and time consuming to shape than the sakura petals.

There a a few little gaps but these will be filled up with small American beech pieces of American beech saw dust and super glue. Your bond to get gaps no matter how accurate you cut the shape.
Again with this type of inlay I don't want heaps of high end detail. Its meant to be inspired by ink sketches so mainly basic organic shapes.
To make things quicker and easier after cutting out the shape if it did not fit in straight away as the piece was too tight I just slightly trimmed more off around the shape with the trim router.

Inlay stem pieces all glued into the top. Now to do the clean up for this which will require planing down the inlay so its flush with the panel face than sand everything. Amongst this will do repairs on gaps etc in the inlay and other repairs to the top.

Cutting out the stem inlay pieces on the scroll saw.


All stem inlay pieces glued into the right side panel.

All stem inlay pieces glued into the left side panel. Like the top these are ready to be cleaned up now.

Cutting out the inlay stems and gluing them into the inlay housings for the back doors.

First back door with all the stems in them. Now just need to plane all the pieces down so it is flush with the door panel face. This is the right door.

Having to shape out some of the housings a little bit more so it matches a bit better with the other shapes on the other doors. I'm not wanting all the shapes to totally match one another. Its meant to have a sketch look ( again inspiration from ink sketches) besides organic shapes like flowers and sticks are not 100 percent the same. I want to get the patterns to look relatively the same but still have the appearance it was done by hand.
If I wanted everything to match 100 percent I would have spent the time in making CNC programs. As well next time I transfer inlay images to router out on dark timber I'll try and find white or yellow graphite paper. I was in a bit of a rush and didn't have time to try and find it. If I used white or yellow graphite paper the shapes would probably match a lot better.
But still I'm quite happy with this since it is a first attempt at router based inlay.
Some of the patterns also will not matter if they are not 100 percent matching since to access the back doors the front doors must be totally folded down so you would not see the comparativeness any way, well most of it.


Stem inlay pieces cut and glued into the back left door. Some of the pieces had to be further clamped down as they were popping up a bit. Like the right back door this now just needs to have the inlay pieces planed down.


Just finished cutting and gluing the stem inlay pieces into the housings for the bottom left front door flap.

Looking good so far.

Starting to cut and glue the inlay stem pieces into the right bottom front door flap.

One thing that I have not mentioned with the the inlay pieces is the grain direction. This is more towards the really delicate thin pieces like this one. You want the thin section to run with the grain direction this will make the piece stronger and less pron to breaking due to grain direction. If its going the other way it has a higher chance of breaking. Theres a lot of handling with these inlay pieces when they have been cut ( sanding) so they can break easy.

Gluing in the last of the stem inlay into the front bottom door flap sections.


Sadly made a mistake on the front top door flap, right side. The router slipped a bit. I had to modify this inlay piece as best as I could to get it roughly looking like the other one on the other door. They don't have to totally much up as I'm not wanting them to be 100 percent identical but this one was pretty bad. I will have to cover up these gap sections with wenge but choosing pieces that match with the rest of the grain.

Stem inlay all glued in for the doors. I'm still thinking of adding in some floating petal inlay in some of the negative spaced sections.

Gluing in the stem inlay for the drawer box bases. Some of the inlay had to be clamped down as it was wanting to spring up even after knocking it in with a hammer.


Stem inlay all glued in for the drawer box bases.


Stem inlay glued in for the drawer box lids under neath side.


Inlay work done for drawer box lids.

Beginning to do the stem inlay for the inside panels. I decided on using a light brown red red gum for this. First I had to sand down the laminate to 2.5mm.

Starting to cut and glue in the stem inlay for the inlay housings for the Ikebana base panel and top drawer box base panels.

Found this type of red gum I had is very brittle had a few breaks that I had to repair.


Stem inlay pieces cut and glued into the Ikebana base panel.

Starting to cut and glue the inlay stem pieces for the top drawer box panel.

Stem inlay cut and glued into the inlay housings for the front right bottom door flap.
Stem inlay pieces cut and glued in for the left back door.

Stem inlay cut and glued in for left side.

Originally I was wanting to have the petal inlay for the inside faces blue. I had bought some water based dyes. The blue dye I bought wasn't really the blue I wanted was too dark when I diluted it with water it seemed to create too much of a light emerald green colour. Also the dye when not diluted with water hid a lot of the grain of the American beech.
I was thinking more of a sky blue this would be best achieved with a manufactured dyed veneer. The place where I normally buy veneers I can get this but would be way to expensive since I only need a little bit, not worth buying a whole veneer bundle.

I tried oiling it with some of the danish oil I have thought about using as a finish. When rubbing it in it did not spread the dye which was good.

I could have done more tests and research but sadly don't have time since I need to get this project done as time is running out so I made a call and decided on using the paduke as the petal inlay pieces for the inside as well.

Starting to glue the paduke petal inlay pieces into the Ikebana base panel.

Sakura inlay petal pieces glued in for the ikebana base panel and top drawer box base panel.

Sakura inlay petal pieces glued into the bottom right front door flap.
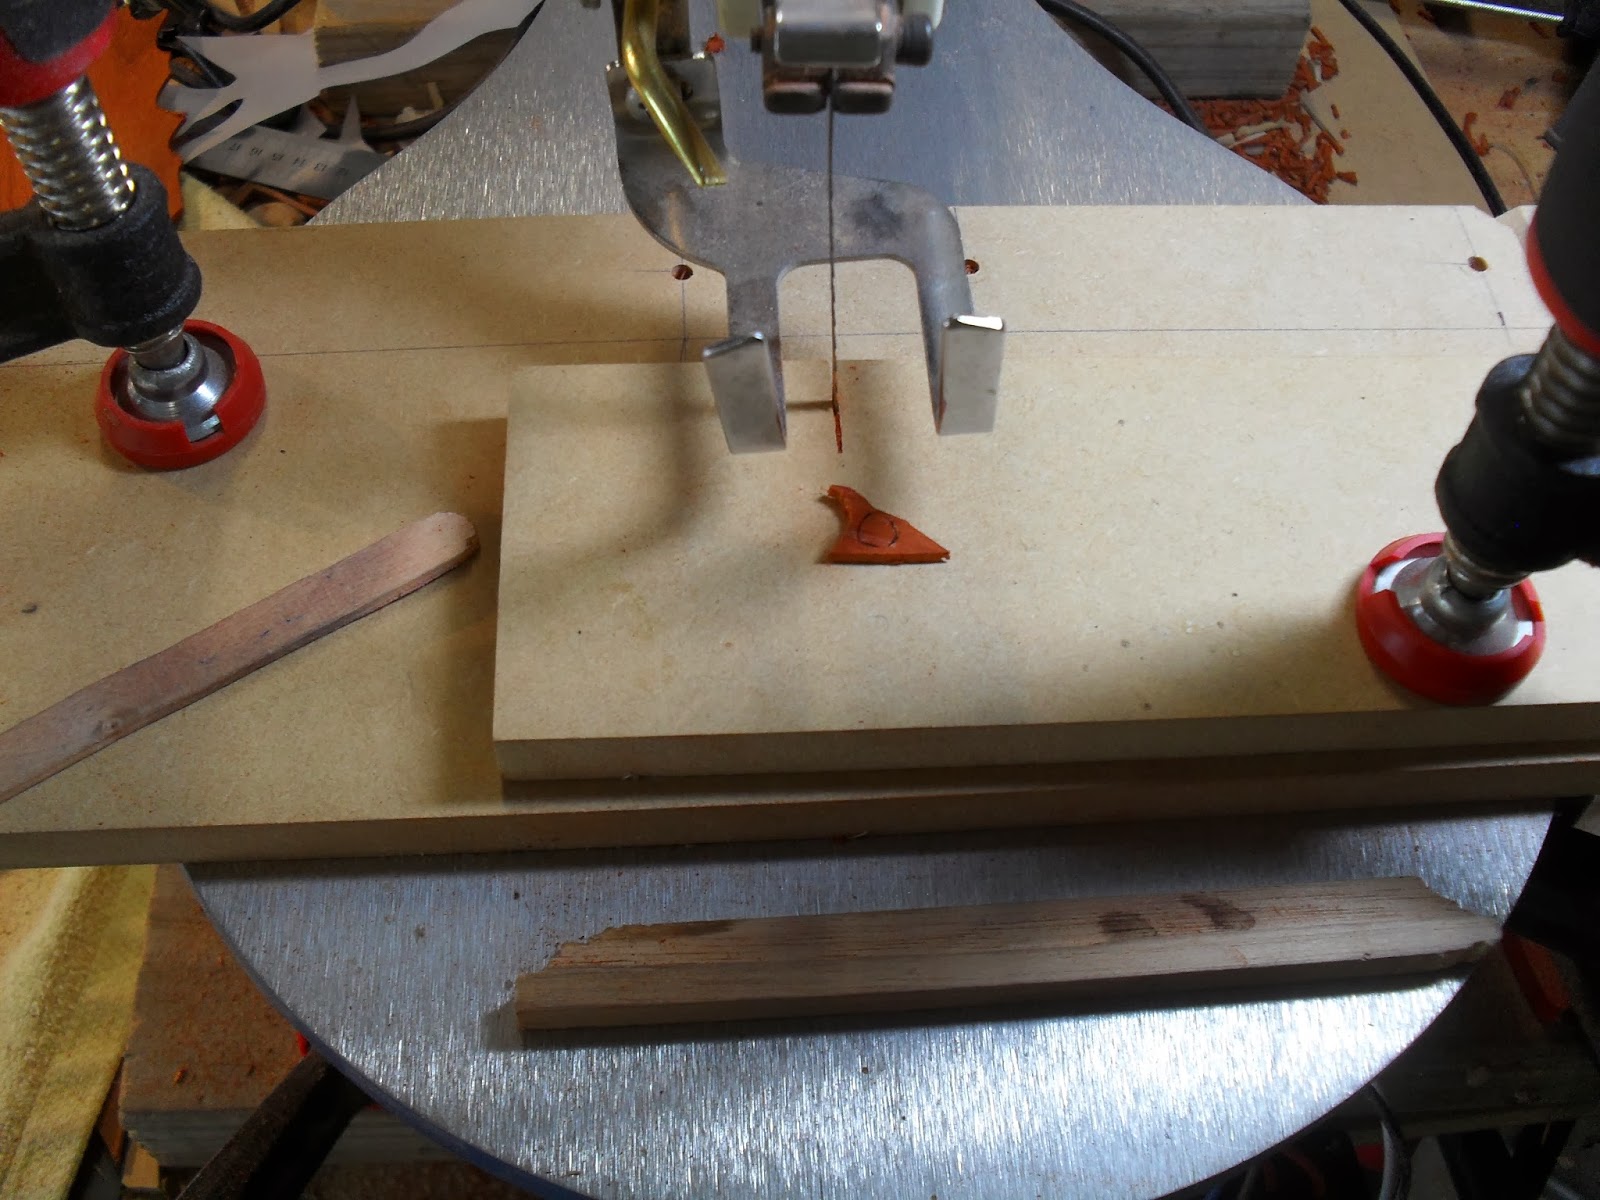
I limited the gap in the table section for the scroll saw perfect for when cutting the really tiny inlay pieces.
Inlay petal pieces glued into the left back door.

Beginning to cut and glue the petal inlay into the housings for the left side side panel.

Inlay petals all glued in.

I had talked about how I wanted to have floating petal inlay pieces for the top and other sections of the cabinet. I did not want to add that much as it would also make everything look too busy.
Placing the petal inlay template pieces from tracing paper onto the top and seeing what the best layout is.

Doing the same for the sides of the cabinet.

I had though about adding in some more petal inlay as this section to me in the main picture looks empty. Although I think adding another main flower section is too much.
Placed it on the top section as well to see what it would look like. Again still to much maybe just involving small selection of petals either 2-3 would be better.


I like this lot better. This means I'll have too do this for everything now, the drawer box bases, sides inside and out, doors, etc.

The petals on the right side are the same as the left just rotated and mirrored.

Cutting the 2mm trim around the petal shapes for the cabinet top. After this waste will be removed with 4mm cutter than the inlay pieces will be cut and glued in.


2mm trim around the floating petal inlay shapes.


Inlay housings cleaned for the extra inlay ready to have the paduke cut and glued in.

Inlay housings cleaned for extra petal inlay ready to have paduke pieces cut and glued in.

Right side done ready to have inlay pieces glued in.

Inlay waste sections removed from the extra inlay petal sections ready to have the inlay pieces cut and glued in.

Extra inlay pieces glued to the large drawer box lids.

Extra inlay pieces add to the drawer box bases.

Extra sections of inlay added to the Ikebana base and top drawer box base.

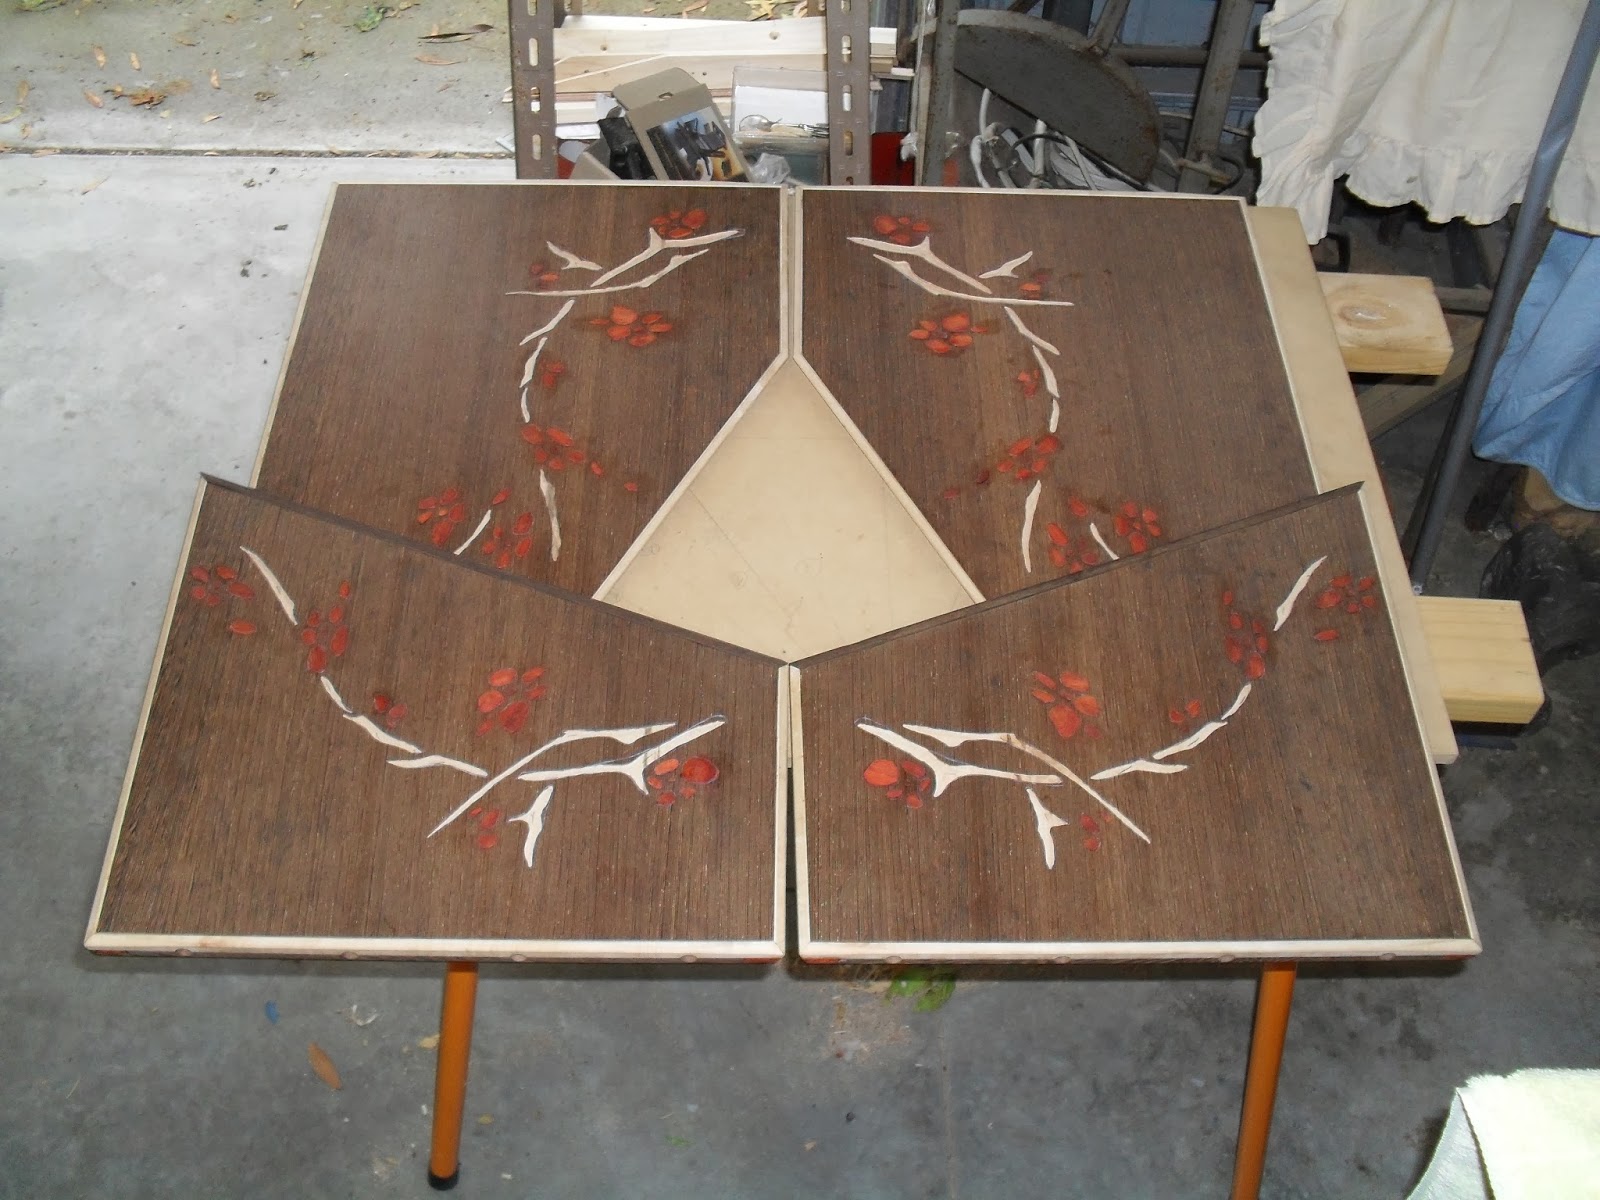
Inlay glued in for the top.

Inlay glued in for the front top door flaps.

Inlay glued in for the bottom front door flaps.

Inlay glued in for the back doors.

All inlay done for the doors now, ready to be cleaned down now.


Added the last extra pieces to the left inside face. I have been thinking of adding floating pieces not necessarily this layout but something small and not too much.

Had to sand down another paduke laminate as I ran out from the last laminate, I only need a little bit to complete the rest of the inlay.

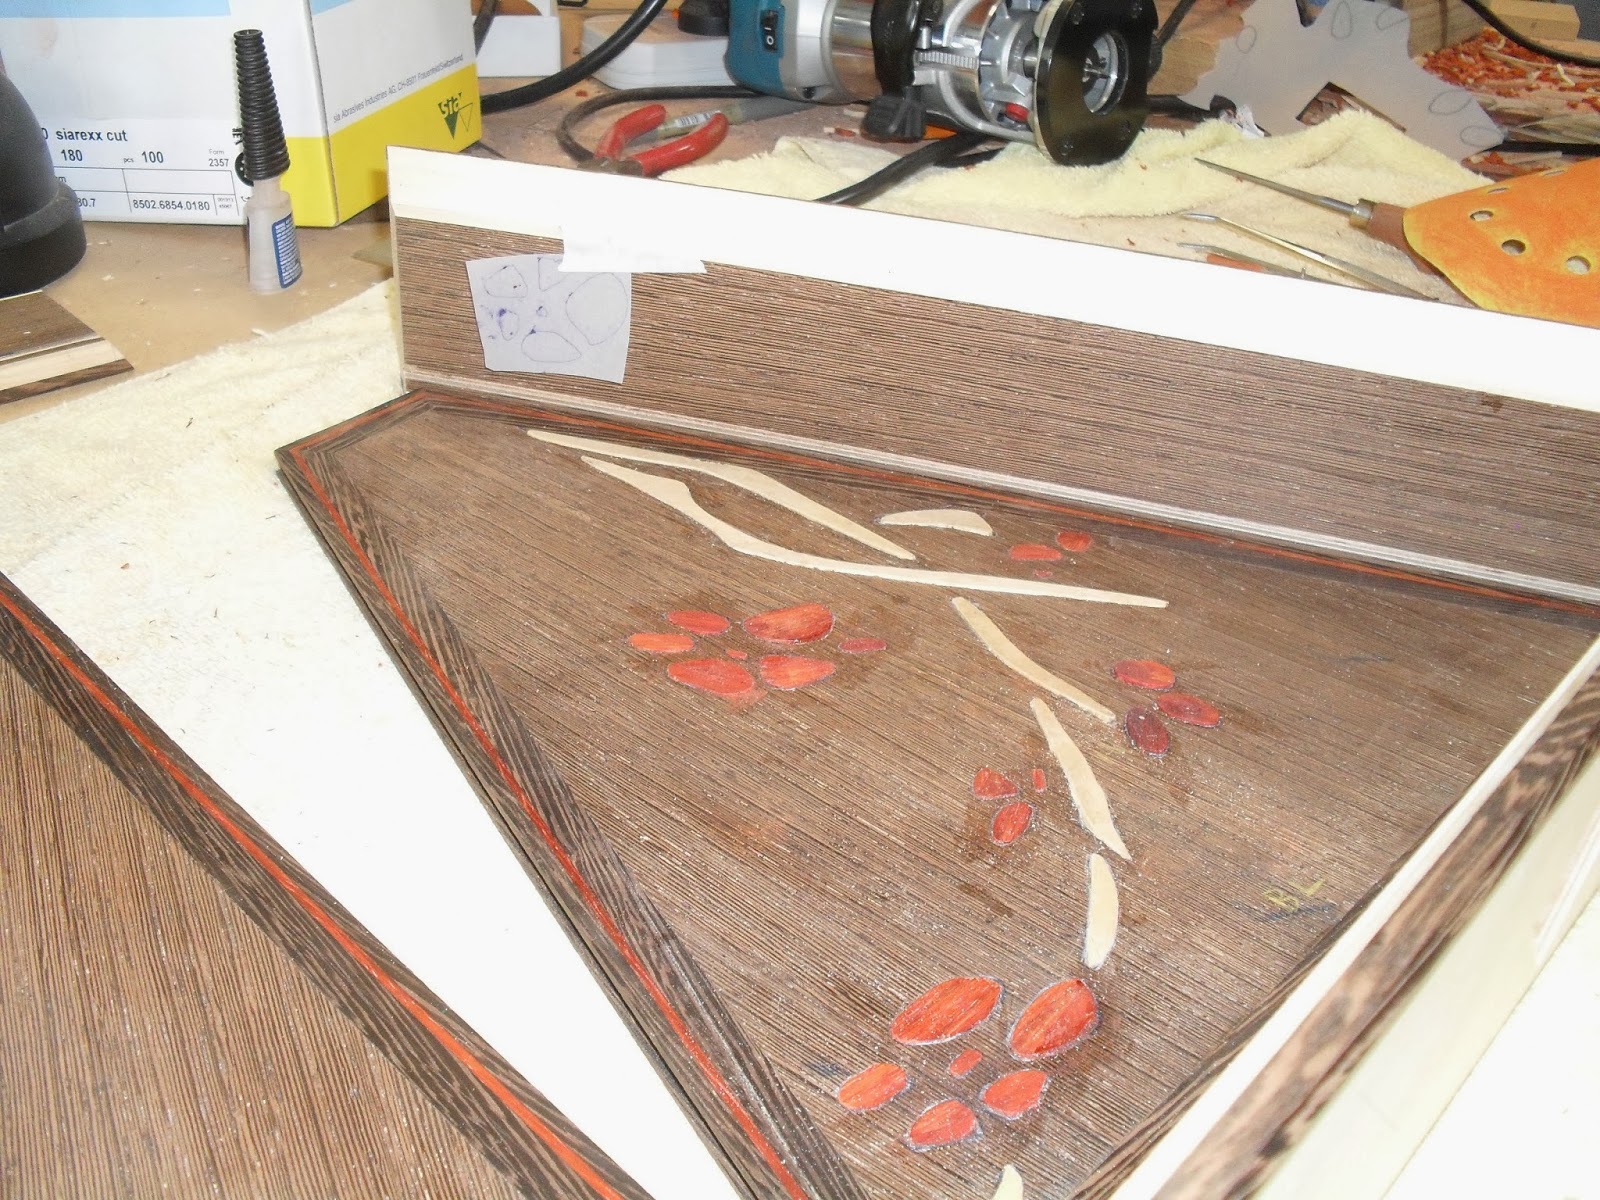
All inlay glued in with for the sides. Quite happy with it especially the floating petals.


Well all the inlay is done now well pretty much most of it. I have a few little extra things I'm think of adding but will not decided to when I do a massive dry run. The things I'm think of adding is small amounts of floating sakura petals on the inside on the maple faces.
Also in my life scale plans I was planning on adding in inlay on the large drawer front side and maybe some floating petals as well. The floating petals is extra but there is only a small amount of inlay on the large sides from the plans. Looking at it now I'm not sure whether I will add it. Besides I cant add it to it yet any way due to the sides not cut to their finished length yet.


I decided on doing a visual run to see what the inlay looked like as a whole in the inside of the cabinet. I had previously thought about adding some floating petals between the main images just like on the outside.
Looking at it now it does seem like it does need to have some floating petals involved.

Took a pic of the back of what it looks like. I'm quite pleased with it. The negative space was really needed and the floating petals really do help with it.

Connection of the front right door flap inlay with Ikebana base panel.

Current inlay as a whole with the base, side and top.

This is what I was thinking with the floating petals for extra inlay. Currently at the moment these are just red colored pieces of paper blue tacked to the panels.
At the beginning I was not thinking of adding inlay to the right side but I actually like it now has that delicate basic element to it.

I did not want to add heaps of floating petals as it will look too dominating and take some of the attention away from the 'V' matched veneer.

The floating petals was also meant to help direct the eye more across the whole cabinet to the other areas.

I actually did not plan on this but I like how the floating petals will connect with the floating petals of the outside section of the top door flap when the door is fully opened and folded down.

I ended up tracing around the pics so I new exactly the positions I have to rout out the housings.

I was thinking this is where I would position the Ikebana arrangement or kodo object offset on the panel.

I only placed the pieces of paper on the Ikebana panel. I traced the shapes from the Ikebana panel and used the carbon tracing paper to transfer them to the top drawer box base panel as I wanted them to be in the same locations.

I also traced the placement of the floating inlay petals from the front right bottom door flap to the back left door. They were to be in the same location just mirrored.

Machining the 2mm stop router cut for the inlay housings on the right panel.

2mm stop router cut for inlay housings for the left side panel.

2mm stop router cut for inlay housings for the Ikebana base panel and top drawer base panel.

2mm stop router cut for inlay housings for the front right bottom door flap.

2mm stop router cut for inlay housings for the back left door.


Removing the waste sections from the inlay housings for the panels.

Cut out the inlay paduke pieces on the scroll saw.

Finished gluing in the paduke inlay pieces for the bottom front door flap right hand side.


No comments:
Post a Comment