Tuesday, 19 November 2013
Whole Cabinet construction
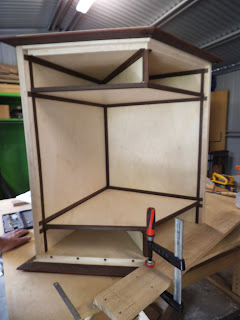
Machined splines to attach the Ikebana base panel, top drawer base panel and top carcass panel. This wasn't the main dry run but just a visual run to see what the cabinet was going to look like.
I needed to see what modifications I was going to need to make.
The drawer divisions do not have dowels placed in yet.
Just placed the back and front bottom door flap up against the cabinet to see what it was going to look like.
I noticed that there is going to have to be a few modifications made.
A while back when cutting the angles to the back and front edges of the sides I realized that I had to come their finished size down a bit due to the base slightly being out. Unfortunately not realizing that this means that the ikebana base panel, top drawer base panel and the top carcass panel will have moved 2 mm forward. Well they are not moving its just its original location has changed due to the sides being shorter in width.
This has then made the back doors finished location different it has too had to be moved forward by 2mm. Also due to the angles on the doors and how the edging extrudes out a bit due to the angle ( about 3mm) this means that it pushes the front door flaps forward.
Now this is a problem since it effects the bottom ZYSA hinge connection between the base and the bottom edge section of the bottom front door flap. To fix this I will have to add edging on top of the already edging on the bottom of the base where the hinge holes are to account for the doors moving further out. These edgings will have to have the same hinge holes drilled in them and placed in the exact hinge hole locations. Once these are attached it will mean that I will have to add in packers to the hinge holes so the holes finish at 11mm deep.
I could not afford to cut down the panels since they had already their wenge mitered edgings added to them. Cutting them down would effect the miters making them look funny
There are a few gaps between the panels but this is due to the inlay strips not being planned down flush with the rest of the veneer panel. I will do another dry run when these are cleaned down to get a better assessment as to what I need to tweak.
But also due to the precise angles I made dark edgings just encase there were little tiny gaps.
There are gaps here but like I said this is due to the raised inlay strips. Also the top of the cabinet might be a little bit out which will create a bit of a problem when connecting the top. I will access this again when all the inlay strips are made flush if its still out I might need to plane down the tops of the sides so the top of the cabinet at fit in place properly.
Placed drawer box fronts in. This also showed me some modifications that I needed to make.
Ages ago I made modifications to the drawers but forgot to update it to the final measurements. This has meant that a few things have to be altered as I'm too far into the project now to make dramatic changes. These changes require me changing the drawer runner system ( not by heaps) and also some things have to be taken out. Originally I was going to have 7mm mitered edging running from the top and connecting to the outside side than bottom.
This 7mm edging I can still have for the bottom and top but I can not have it for the outer side. I had to do this to continue the 1mm gap all round. I cant cut down the fronts more since it will effect the bases.
Thinking a bit I don't think I will need to oil these sections before assembling the whole cabinet together. They are actually not that hard to get into. But with other cabinets I have seen that with drawers they don't oil the whole internal sections, they only oil about 1/3 to 1/2 way in. But these cabinets are for traditional drawers where they don't completely come out. These boxes completely come out.
Its mainly the top internal drawer cavity section that would be mainly seen if it all did not get oiled.
I'm quite happy with how the blond maple veneer connects with the dark wenge edging creates that very warm contrast.
Changing the drawer runners. Originally I was planning on using 20mm wide runners. I have thought about changing this to 15mm wide runners. Although the front sections will still be 20mm wide as the front of the drawer boxes are 16mm and I want that extra 4-5mm to act as a support lip. The sides are only 12mm wide.
Side sitting on 15mm wide drawer runner.
15mm wide.
20mm wide.
side sitting on 20mm wide drawer runner.
Subscribe to:
Comments (Atom)


